Monday, February 21, 2011

How to Connect BlackBerry Devices

What is Blackberry Connect?

Blackberry Connect is the name given to RIM's licensing scheme which allows other manufacturers to include 'Blackberry Functionality' on their devices. Connect is a stripped down implementation of the Blackberry stack, and so does not support all of the product features that are available in Blackberry.
Originally there were two separate licensing schemes, Connect and 'Built-in'. Connect was the stripped down stack, and Built-in was the full version that ran almost as an application on the device. Built-in never really took-off, indeed in Europe it was only deployed on one device model the ill-fated Siemens SK-65.
Nowadays the Connect model is licensed for a wide range of manufacturers handsets (see devices) which includes Nokia, Sony Ericcsson, Windows Mobile etc.

How does it stack up compared to a full Blackberry

It depends really on the usage that you wish to put the device to and the nature of the handset itself. As the connect is an application that integrates with the device o/s if the device o/s is slow or doesn't have enough memory then the Blackberry experience is equally crippled.
I'd recommend that you test it our prior to committing to purchase or at least take advantage of a 14-day return policy offered by your carrier to return it if you don't like it.

How do I get the sofware / install it on my device?

This is often not quite a straightforward as it seems. Please see the device specific information links for more details on your device. Note however that your carrier may not officially support that device or Blackberry Connect on your device even if another carrier in other parts of the world does support it. For example, in the UK, anyone wanting to use the Sony Ericcson p910i client for a long time had to download the software from T-Mobile Austria and install that version.
Even if a handset is advertised as having BB Connect, then it's not guaranteed that this has been pre-installed on the device. You may have to install from a memory card, or a website download.
It's also become apparent that it can be a bit tempremental on s/w version levels. Sometimes you need to upgrade your brand-new handset to get it working, or occassionally the handset upgrade can break the connect client, until a later release of the client.

How do I activate my Blackberry Connect Device on a BES?

Assuming you've got hold of the client s/w for your device, then you should also be able to get hold of the desktop sofrware for that device from the same place. Note this is specific to the give device manufacturer - i.e you need "Blackberry Desktop Software for Nokia" and not another manufacturers s/w or the generic RIM product in order for this to work.
Then follow thses steps
  • Check your mobile plan with your carrier that you're provisioned for BES not just internet mail (cures 50% of all known "I can't activate" issues)
  • Install the software onto your PC - (note your IT department might not like this)
  • Install the s/w onto the device (if not preloaded)
  • Ensure you're logged to the desktop PC as yourself (not admin mode) and with your email client open
  • Start the application on the device and then connect the cable to the USB port of the PC
  • Wait for the desktop software to recognise the PIN code of the device and then update with the new PIN code.
  • Manually generate the encryption key - wiggle the mouse a bit.
  • Voila you should be up and running...
If you are using the device on a company BES I strongly recommend talking to the IT department prior to trying to do this on your own - it might be against company policy.

What are the limitations of a Blackberry Connect Device on a BES?

As we mentioned above Blackberry Connect is a slimmed down feature set (similar to a 3.6 device)and the key limitations are: -
  • No Enterprise Activation - that's why you need to cable activate as above
  • Only Supports Email and Calendar Syncs - no tasks, contacts or notes
  • Restricted set of IT policies - which vary from device to device - kill handheld won't remove data sync'd locally to device (outside the BB client stack - e.g. Notes)
  • No wireless backup
  • No support for MDS browsing - this is a major issue if you want to web-browse/IM and BB Connect Email
  • Lookups against the Corporate Directory only returns the email address not all the contact info including phone numbers like the BB lookup. (This was introduced in BB Connect v2.1.2.31)
  • PIN to PIN messaging doesn't work
  • Maximum attachment size of 32k (as of v2.1.2.31 on wm5)

When are these limitations going to be removed?

Like all supplier roadmaps, this is not clear/deliberately vague. Essentially some of this will come in when the Blackberry 4.0 build client software becomes standard. As to when this will happen, then sometime in 2007 is fair to say, but once released by RIM it will take some manufacturers a while to upgrade their s/w stack to support 4.0

How do I activate my Blackberry Connect for Internet Mail?

(to be added)

Device Specific Information

  • Sony Ericsson p910i
  • Sony Ericsson p990i
  • Sony Ericsson w600
  • HTC JasJar (& derivatives)
  • HTC Universal (& derivatives)
  • Nokia E61
  • Nokia 9500
  • Palm Treo 650

How to Use GPS on a Blackberry Curve

The GPS function on the Blackberry Curve can be an excellent tool for navigation. It is fairly simple to enable, and once engaged, you can use it as a tool in your car, in a city or simply when you are lost. Here are some helpful steps.

Instructions

  
    1.      Locate your owner's manual. Inside it will give tips on how to access your GPS feature, how to use navigation and how to troubleshoot your GPS problems. Contact your Blackberry retailer with specific questions.
  
    2.      Choose "Advanced Options" under the "Options" menu. From that menu, select "GPS." Then select the "Menu" button. After this, click on "Refresh GPS." This series of operations will reset the GPS locator on your phone, and within seconds, give you a latitude and longitude reading--your exact global position.
  
    3.      Download "Google Maps" from the link in the resources section. This will ease your navigation needs. Once downloaded, go from "Options" to "Applications" to "Google Maps" and select the menu and go to "Edit Permissions." Select "Connections" and the menu to expand this. Select "Location" and "Internet Connections," and make sure these coordinate with Google Maps. Now you can use turn by turn directions with Google Maps.
  
    4.       Troubleshoot your Blackberry GPS system if it fails to read a signal. If you are near a building and are not receiving a signal, move into an open area for line of sight. If you are indoors, move closer to a window. If you have just activated the GPS on your phone for the first time, let it search for a few minutes before you begin utilizing the function.
  
    5.      Contact your retailer with more confounding problems, or if the GPS fails to work entirely.
 

How to Use the GPS on an IPhone 3G

One of the most anticipated features on the iPhone 3G was the inclusion of GPS technology. Apple's incorporation of GPS (Global Positioning System) onto its portable mobile phone enables users to receive directions and navigate anywhere they are in the world. Whether you are in your car or walking around a foreign city, the iPhone 3G makes it very easy to figure out where you are and how to get to your destination.

1. Tap "Settings" and go to "General." Make sure that "Location Services" is turned on.

2. Go back to the "Home" screen and tap "Maps." Tap the scope icon on the bottom left corner of the screen. Click "OK" when the iPhone asks if Maps can use your current location. The iPhone GPS will now locate where you are.

3. Tap the "Directions" tab on the bottom of the screen. Enter the address of where you want to go in the "End" field. Tap "Route."

4. At the top of the screen, select your mode of transportation: Car, Bus, or Walking. You should see a green pushpin marking your current location on the map. The red pushpin is your destination. The message at the top should indicate how many miles away your destination is and the approximate amount of time it will take to get there.

5. Tap the "Start" button on the upper left corner of the screen. Maps will give you step-by-step instructions on where to head next. The iPhone GPS will continue to track your location as you move.


  • 2
    Go back to the "Home" screen and tap "Maps." Tap the scope icon on the bottom left corner of the screen. Click "OK" when the iPhone asks if Maps can use your current location. The iPhone GPS will now locate where you are.

  • 3
    Tap the "Directions" tab on the bottom of the screen. Enter the address of where you want to go in the "End" field. Tap "Route."

  • 4
    At the top of the screen, select your mode of transportation: Car, Bus, or Walking. You should see a green pushpin marking your current location on the map. The red pushpin is your destination. The message at the top should indicate how many miles away your destination is and the approximate amount of time it will take to get there.

  • 5
    Tap the "Start" button on the upper left corner of the screen. Maps will give you step-by-step instructions on where to head next. The iPhone GPS will continue to track your location as you move.

  • How to Upgrade Office 2007 to Office 2010

    The recently released Office 2010 beta provides an option to upgrade your existing version of Office 2007 to Office 2010. You can either chose to upgrade the current version of Office to Office 2010 beta or selecting Customize allows you to set your current version of Microsoft Office to coexist with Office 2010 Beta. To upgrade from the existing version, run the set up file from the Office 2010 installation CD or the exe file.
    Accept the License
    Accept the terms of the license agreement and click continue.
    Upgrade
    In the next step you will have two options, one to upgrade the current version or to customize the install. If you select Upgrade from this option, then your older version of Office will be replaced with the new Office 2010 beta.
    Selecting Customize allows you to set your current version of Microsoft Office to coexist with Office 2010 Beta, with the exception of Outlook and SharePoint Workspace (formerly known as Microsoft Office Groove 2007). Outlook 2010 and SharePoint Workspace 2010 cannot coexist with previous versions on your computer, so you will need to select one version of the program to have installed on your computer.

    Install Office 2010 with old version
    Since Outlook 2010 cannot exist with previous version, you can have only one version. So if you do not want to upgrade to Outlook 2010, then unselect this from the installation options tab. Once you have selected the version click upgrade. You can also selectively upgrade using the third option available in the customize window.
    Installing Office 2010
    Now Office 2010 will install on your machine with the option selected by you. Office 2010 Beta software will no longer function after October 31, 2010, If you had selected Upgrade to Office 2010 Beta directly instead of Customize to set the Beta to co-exist with your original Microsoft Office version during the download process, you will need to manually reinstall your previous version of Microsoft Office to resume your original setup.

    How to Understand

    Stuck on a problem in math class? Or are you confused on why you weren't allowed to go to the movies with your friends? Understanding life can be hard, but once you take things into a new perspective, the issue may become a whole lot clearer.
    Being able to understand problems, situations or just the meanings of things can be a bit difficult unless you know the ropes, so read this article on how to understand just about anything.

    1 Realize you obviously can't understand something or you are confused and that you need some guidance. This is the first major step, and whilst some may not think it is important, admitting you need help is vital when you don't fully grasp the idea or meaning of something. This will allow your mind to be open to suggestions and make reading this article a great deal easier and much more beneficial.

    1. 2
      Ask yourself the '5W's. That's right, the simple technique you learned back in second grade is just as useful to understand things as it is to write a short story. Ask yourself -
      • Who the misunderstanding is about (this doesn't have to be human - it could be a math confusion)
      • What confuses you (is it the wording? Is it how someone is acting?)
      • When the confusion took/takes place or when you need to solve it (do you need your math homework done by the morning? Do your parents want you to solve a misunderstanding with your sisters today? Does your boss want you to work out how to do something?)
      • Where the confusing incident took place or where you have to solve it (your math problem - a desk)
      • Why it is confusing and why there is a misunderstanding to begin with
    2. 3
      Once you have thought about at least one answer for each W, write it down on a piece of paper or type it up. Then, stick the sheet on your bedroom ceiling above your bed or on your fridge or on the dashboard of your car - somewhere you will see it a lot so you can be reminded about your confusion. When you think about it quite frequently, your brain will become more familiar with the issue and will try and see if it can work the problem out. This is another important step. Print off multiple copies. Set a reminder on your phone, put a sticky note on your computer screen, write it on your hand, on the coffee table - wherever is a frequently-visited place.
    3. 4
      Don't be afraid to ask for help. Ask your mother, best friend, neighbor, anyone who you think could help you understand. Maybe taking somebody else's perspective on things can help you clearly understand something. If your friend is feeling angry at you for something you might have done, ask her to talk. She will hopefully understand your side of the story, and hopefully you will understand theirs once you have finished talking. Humans are blessed with voice and so we should use it for good. Ask around, ask your friend for advice. This is important, asking for advice. Just go with something simple like, "Hey Lisa, if you're in an argument with a friend, how would you make a compromise?" or "Dad, how do you understand both sides of the story?". "Mr Richards, can you please help me with this math equasion?" and "Coach, by 'kicking the ball with your shoelace', what exactly do you mean?" are good examples. Remember, there are multiple sides to every story. Ask around and sample a few! If it is about a more serious or private matter, talk to a councilor for help.
    4. 5
      Stop and think. If you're wondering why the girl on your favorite TV soapie is crying, stop wondering and think - she has a black eye and she's at a pub with her friend - now ex-friend. Understand a bit better? It's all about using your human instincts to work out your surroundings. If your friends are mad at you, was it something you said to somebody else? Was it something you did that they're not comfortable with? You have to stop and think before charging ahead in life, it is what causes the confusions and misunderstandings and you only get to live each moment once. If you think about what is happening and what has happened, and use the 5W strategy, you should be able to work most issues out quickly and easily. So next time you're not understanding a lecture by your lecturer or you are not so sure what the issue is about, remember to stop what you're doing and stop the worrying, think about what the problem is and what you need to do, and then continue to use the 5W strategy. Not so much a second grade thing anymore, is it?
    5. 6
      Admit that you might be wrong about your interpretation of something and that your idea of things might just be a misunderstanding. Even if you think that you are completely right and that you are definitely sure, simple things can cause misunderstandings and can throw things out of whack. If somebody does end up to be correct over something you were wrong about, just mention, "Wow, what you said is true! Sorry, I must have misunderstood something" or even just a "Now I think about it, I might be wrong". People will notice the strength needed to say that, and they might even understand your point of view! Admitting when you are wrong also allows you to realize how easy it can be to misunderstand something even if it seems utterly obvious. Saying that the other view was correct and respecting the fact that yours was wrong is vital in maintaining a clear understanding of things, as well as being courteous. So next time you are completely sure that you're right, double check, use the strategies explained in this article and you're on the path to understandhood!

    How much memory is enough in Windows Vista?

    Usually a hardware upgrade isn't required for a new operating system. Yet if you are planing to upgrade Microsoft Windows XP to Microsoft Windows Vista, it's almost impossible to avoid a PC overhaul. Aside from things like the speed of your processor (minimum 800MHz), and using a videocard that supports Vista's sublime Aeroglass graphical interface (DirectX 9), the most important and limiting factor is going to be memory. If the PC doesn't have enough RAM to satisfy Vista's intense thirst, you'll be the slowest thing on two wheels. For the record, Vista's minimum memory requirement is 512MB, though realistically that should be doubled.
    Much of the focus on Microsoft Windows Vista has revolved around its steep graphical interface requirements. Vista craves graphics cards that are DirectX 9.0C compatible with 128MB of memory to run its AeroGlass feature. Next is the large drive space requirement, sitting at 15GB just for its installation files, Vista is a fat OS.
    Getting back to the memory requirements. Microsoft Windows XP required 128MB to operate (not fast, but it'll work), but four times that amount of system memory is required by Windows Vista just to install. Vista will function with 512MB system RAM, but the ride is a rough one. Microsoft recommends that Vista computers ship with 1GB of memory, and considering its recommended specs, that's wise advice.
    If you are not sure your computer will work with Microsoft Windows Vista, here's a quick test. If it's using SDRAM or RDRAM memory, it's probably too old. For a more definitive answer, run Microsoft's Windows Vista Upgrade Advisor and take a look at the report. If your PC is 2 years old or so, you will probably get by with a quick hardware upgrade here or there.
    What is the Right Amount of Memory for Vista?
    Generally speaking more computer memory is better than less. However, installing more than 2GB of RAM doesn't necessarily translate into a faster Vista desktop PC. Only a few applications may see improvement, and then the law of diminishing returns kicks in. So 2GB of RAM is generally considered the sweet spot for Windows Vista. As the operating system matures, along with supporting software, it's possible that number will climb. It's a wise move to choose a PC that can be upgraded to 4GB.
    Microsoft Windows Vista has one new feature called ReadyBoost which you may have heard about. It was intended to augment PCs with low amounts of system memory so Vista might run quicker. The thinking being that a USB drive could act as a dedicated read buffer for the system.
    Regardless of what Microsoft may claim, ReadyBoost is more of a memory supplement than system memory replacement. A slower PC system will get more benefit from 1GB of system RAM than 4GB of ReadyBoost USB memory acting as a buffer.
    PCSTATS has tested the impact of ReadyBoost with different amounts of system RAM, in this article. Impact was minimal on the whole, big changes occurred from the step up from 512MB to 1GB. There's a lot more to this, so have a look at the article, it will clarify any questions you may have about ReadyBoost.
    Of all the different Microsoft Windows Vista versions, Home Basic gets away with the least system memory because the OS is more compact and robust. Its minimum requirements are 512MB, whereas the other versions are pegged at 1GB. Additional features like AeroGlass and Windows Media Center for example add to system load.
    If More RAM is Better, is a Lot More RAM Even Better?
    Short answer, no. If a PC is installed with 4GB of system memory, the computer itself will register 4GB but Windows Vista/XP will not be able to recognize it all. It's nothing to fret over, this is a normal limitation with 32 bit operating systems. The operating system will report 3.5GB or so, but the "missing memory" (varies between 500MB-750MB) is there, reserved for hardware devices.
    It's possible to install more than 4GB of memory in a PC, but that will require the use of Physical Address Extensions (PAE). This feature is primarily a workstation/server option, and realistically there isn't much need for that much memory in a desktop system. Another option is to install Microsoft WindowsXP 64 bit Edition, or the 64 bit version of Windows Vista.
    Windows Vista SuperFetch uses more memory than WindowsXP's version
    Modern operating systems automatically load commonly used DLLs and programs into memory, so when decide to load an application you use frequently, it pops up faster. To make this happen, since Microsoft Windows 95, there has been a function called Prefetch which monitors user activity and preloads those application extensions into system memory.
    In Microsoft Windows Vista it is called SuperFetch, and it reserves about 33-50% of system memory for this purpose. Essentially Windows Vista looks at how the computer user accesses application and data, and keeps the most often used applications and tasks loaded into cache memory. This makes loading applications quicker and is supposed to offer users a smoother ride. It does not take system memory away from the OS or applications, if memory demand his high SuperFetch will automatically adjust its size.
    We're just trying to clear the common misconception that Microsoft Windows Vista is poor at memory management. Windows Vista seems to consume a lot of memory because its SuperFetch feature grabs memory for itself upon startup.

    Vista Memory usage per version
    Operating System
    Fresh Install Memory Usage
    Recommended Memory Size Installed System Memory
    Microsoft Windows Vista Home Basic 554MB 512MB 1GB
    Microsoft Windows Vista Home Premium 552MB 1GB 1GB
    Microsoft Windows Vista Ultimate 541MB 1GB 1GB

    The above examples were done with a total of 1GB of system memory. With 2GB or 4GB of memory, Windows Vista (all versions) grabs ~800 MB. The more system memory installed, the more Vista will be able to cache programs, tasks and services.

    How to Check Windows XP Memory Usage

    Have you ever wonder how much memory (RAM) your computer is currently using? It would be interesting to know your PC's memory usage at a glimpse and how it's performing. Instructions follow:

    Note: This article is intended for Windows platform PC with XP O.S. (any version) installed.
    METHOD 1

    Find and click on the 'Start' menu. Click 'Run', then type in the searchable text box 'DXDIAG' (in capitol letters or small case alphabets; doesn't matter). Click 'Enter' then you can check performance details of your system.

    METHOD 2

    Find and click on the 'Start' menu. Choose Programs > Accessories > System Tools > System Information. The detail information about your system hardware and software will be displayed here.

    METHOD 3

    Right click on 'My Computer'. Select the 'Properties' option. The system information will be shown after you select the properties option.

    Checking your computer memory usage is very useful in determining if your PC is wasting RAM resource (aka. memory leak). Peak memory usage may be caused by applications/programs that are currently useless, but are running themselves. This indeed, takes away many usable memory from your CPU.

    Peak memory usage (performing at 100% capacity) can make your computer sluggish or crash. Suspecting programs that can operate themselves on your computer are spyware, malware and software of similar kind. Visit my other article for stopping unwanted programs running on your computer in the below 'Resources' link section.


  • 2
    METHOD 2

    Find and click on the 'Start' menu. Choose Programs > Accessories > System Tools > System Information. The detail information about your system hardware and software will be displayed here.

  • 3
    METHOD 3

    Right click on 'My Computer'. Select the 'Properties' option. The system information will be shown after you select the properties option.

  • 4
    RAM module
    RAM module
    Checking your computer memory usage is very useful in determining if your PC is wasting RAM resource (aka. memory leak). Peak memory usage may be caused by applications/programs that are currently useless, but are running themselves. This indeed, takes away many usable memory from your CPU.

    Peak memory usage (performing at 100% capacity) can make your computer sluggish or crash. Suspecting programs that can operate themselves on your computer are spyware, malware and software of similar kind. Visit my other article for stopping unwanted programs running on your computer in the below 'Resources' link section.

  • How can I check if my computer has enough RAM?

    Before we check current RAM (Memory) usage of your computer, lets define what "RAM" means, what it is and its usage.
    RAM is short for Random Access Memory. It is a physical piece of hardware similar to the one shown below that is installed inside your computer. RAM is measured in KB (KiloBytes), MB (MegaBytes) or GB (GigaBytes).
    RAM CHIP / DIMM (Dual Inline Memory Module)
    RAM CHIP - DIMM (Dual Inline Memory Module)


    How is RAM Used?

    RAM's function is somewhat similar to the short-term memory that a human brain uses for all of its computations.
    When you launch a program such as Microsoft Word, it is first loaded from Hard Drive (permanent storage) to RAM (short term storage) then executed by your computer. If your computer has a lot of RAM installed, you can run multiple software without slowing things down.


    Does RAM store data in it permanently?

    RAM is volatile in nature; meaning it requires constant electrical power to refresh itself in order to keep the data contents stored in it. When power is turned off, all data stored in RAM is lost.

    How do I check current RAM usage on my PC?


    Windows 7/Vista:

    Step 1: To check current Memory usage on a Windows 7/Vista computer, right click on Task Bar (Task Bar is the Grey/Blue bar at the bottom of the screen) then left click on "Start Task Manager".
    Windows 7 Task Manager
    You will see "Windows Task Manager" window. Task Manager shows application currently running on your computer.
    Step 2: Click on "Performance" tab within "Windows Task Manager". A screen similar to the following appears. This screen shows Memory and CPU usage statistics of your computer. 
    Windows 7 Task manager
    To keep this guide simple, we will note:
    • "Total" under Physical Memory; which in this case is 2047MB or 2GB.
    • "Memory" Section shows the amount of Memory computer is currently using; which in this case is 1.13GB.
    • "Commit (MB)" value in right side column shows the total of Physical RAM and Virtual Memory in MB (Mega Bytes) currently in use; which in this case is 1619MB or 1.58GB.
    As you can see, "Total" RAM value (2GB) is more than total Commit value (1.58GB); so this computer does not need a RAM upgrade.
    But if "Total" RAM value (2GB) for example was lower than "Commit" value then you should upgrade the RAM.

    Question:

    How is it possible that "Commit" value be larger than "Total" RAM?

    Windows XP/2000:

    Step 1: To check current Memory usage on a Windows XP/2000 computer, right click on Task Bar (Task Bar is the Grey area at the bottom of the screen). A small window similar to the following appears:
    Windows XP Task Manager - Showing Running Programs
    "Windows Task Manager" window appears. Task Manager shows application currently running on your computer.
    Step 2: Click on "Performance" tab within "Windows Task Manager". A screen similar to the following appears. This screen shows Memory and CPU usage statistics of your computer. 
    Windows XP Task Manager
    In this screen, Physical Memory section shows the Total Physical memory installed in the computer. Which in this case is 129528KBytes (Kilo Bytes) or 128MB (MegaBytes).
    Commit Charge section shows current memory usage of the computer; which in this case is 226820KBytes or 226MB. Since this computer was turned on, Peak memory usage was 227MB.

    Question:

    My "Commit Charge" value is more than Total Available Physical Value. How is that possible?
    Hmm this sounds quite confusing, but there is a simple explanation. When computer runs out of physical memory (RAM), it starts using a portion of the hard drive as temporary memory known as Virtual Memory (also known as Page File).
    Use of Virtual Memory increases wear and tear of the Hard Drive because computer has to continuously swap (juggle) data between RAM and Hard Drive. This drastically reduces overall performance of the computer because Hard Drive (a mechanical device) is many many times slower than RAM (an electrical device).
    Conclusion: To determine if your PC needs a RAM upgrade or not, turn your PC on and use it for a day like you would normally do. At the peak of your day when you have all the software programs you normally use open, check if your computer is using Virtual Memory or not? If Virtual Memory is being used excessively, then it might be a good idea to upgrade RAM!
    Given the complexity of the modern software and low prices of RAM, on average a home PC running Windows 7/Vista/XP/2000 should have at least 2GB RAM to function properly. With Windows 7/Vista go with 4GB if you can afford to spend a few more dollars.
    This cheap yet important upgrade will increase your computers performance and hard drive's life for pennies on the dollar!

    how to configure gmail in outlook 2007


    1. Enable IMAP in Gmail. Don't forget to click Save Changes when you're done.
    2. Open Outlook.
    3. For new setups, select Do not upgrade.
    4. Click Yes.
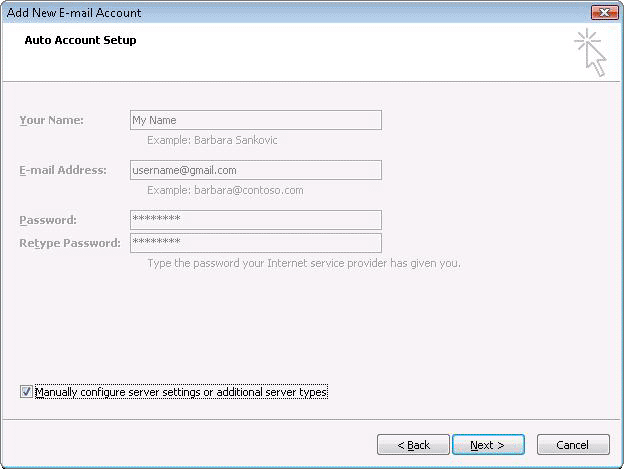
    5. Enter your display name, email address (including '@gmail.com'), and password. Google Apps users, enter your full email address, e.g. 'username@your_domain.com.'
    6. Select the 'Manually configure server settings or additional server types' checkbox.
    7. Select Internet E-mail.
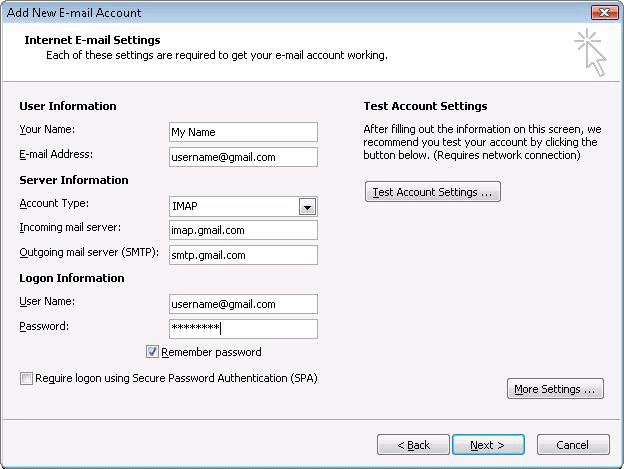
    8. Settings: name, full email address (including '@gmail.com' or '@your_domain.com')
      • In the Account Type dropdown menu, select IMAP; enter the incoming and outgoing server names shown below.
      • In the 'User Name' field, give your full Gmail address, including '@gmail.com' or '@your_domain.com.'
      • After creating these settings, clicking Next takes you to the end of the setup.


    9. In the Tools menu, select Options then Mail Setup. Under 'Email Accounts,' click E-mail Accounts.
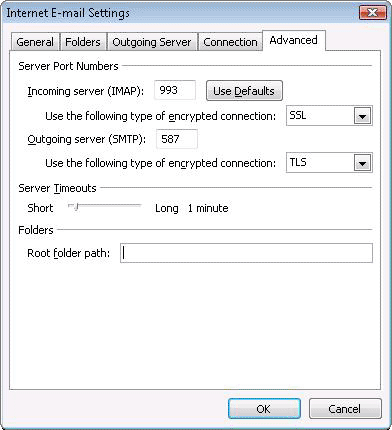
    10. Select an account, and click Change above the list of accounts. Click More Settings, then the Advanced tab.
      • Incoming server must be 993, and must use SSL encryption.
      • Outgoing server can use 587, TLS encryption.
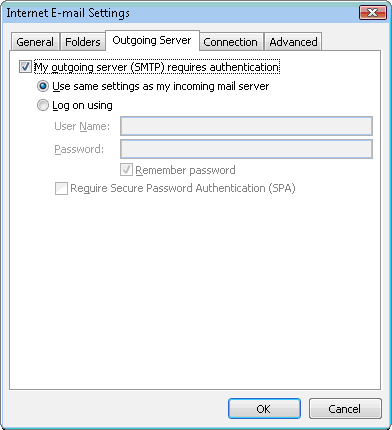
    11. Click the Outgoing Server tab. Make sure that 'My outgoing server (SMTP) requires authentication' is selected. The radio button 'Use same settings as my incoming mail server' should also be selected.
    12. Click OK > Next > Finish > Close > OK.
    13. Check our recommended client settings, and adjust your client's settings as needed.

    To set up your Outlook 2007 client to work with Gmail:

    How to set up your home wireless network

    5 steps: How to set up your home wireless network

    You can use a wireless network (WLAN) to share Internet access, files, printers, game consoles, and other devices among all the computers in your home. After you’ve completed the initial wireless router setup and added your computers and devices to the network, you can use your home network to surf the web or to play online games—whether you're sitting in your living room or relaxing in your backyard. It's easier than ever to set up a wireless network.
    Man with a laptop in a hammock

    What you’ll need to set up your wireless network

    • An operating system that supports wireless networking
      The Windows 7 operating system fully supports wireless networking. For Windows Vista users, we recommend installing Windows Vista Service Pack 2 before setting up your wireless network. For Windows XP users, we recommend installing Windows XP Service Pack 3. Use Windows Update to check whether you need the service pack and to install it. Click the Start button, click All Programs, click Windows Update, and then click Check for updates. Although the service packs for Windows Vista and Windows XP are not required for wireless networking, they can make things much easier and can help protect you against hackers, worms, and other Internet intruders.
    • A broadband (DSL or cable) Internet connection
      To set up a wireless network, you need a broadband or high-speed Internet connection (not a dial-up connection) provided by an Internet service provider (ISP), usually for a monthly fee. Two common broadband technologies are Digital Subscriber Line (DSL) and cable technology. These require a DSL modem or a cable modem (often provided by your ISP). After you have an ISP and a modem, you're ready to connect to the Internet.

      Set up a new connection to the Internet:
    • A wireless router, a DSL modem, or a cable modem with built-in wireless networking support
      The router converts the signals coming across your Internet connection into a wireless broadcast, sort of like a cordless phone base station. Newer DSL and cable modems come with integrated wireless networking capability and are called modem routers. If the modem router you received or purchased from your ISP already has wireless capability built in, you do not need to purchase a separate wireless router. Just follow the instructions provided by your ISP for activating your wireless connection.

      If you do need to purchase a wireless router, be sure that you buy a wireless router and not a wireless access point. The Linksys router is a popular router for wireless networks because it’s simple to set up.

      While you're looking for a wireless router or other wireless equipment in stores or on the Internet, you might notice that you can choose equipment that supports four different wireless networking technologies: 802.11a, 802.11b, 802.11g, and 802.11n. We recommend 802.11g (Wireless-G) or 802.11n (Wireless-N) because they offer excellent performance and are compatible with almost everything.

      NOTE: If you do not want to buy a wireless router or if you want to connect computers or devices temporarily for a specific purpose, like sharing devices or games, you can set up a temporary wireless network without a router. This is called an ad hoc network.

      Set up an ad hoc network:
    • A computer with built-in wireless networking support or a wireless network adapter
      If you have a newer computer, you may already have built-in wireless capabilities. If this is the case, you don’t need a wireless network adapter. Here’s how to check whether your computer has wireless support installed:

      Windows 7 and Windows Vista


      • Click Start, click Control Panel, and then click Network and Internet. If you see any of these words listed, “Wireless,” “WLAN,” “Wi-Fi,” “802.11a,” “802.11b,” “802.11g,” or “802.11n,” your computer has wireless capability installed.

      Windows XP

      1. Click Start, right-click My Computer, and then click Properties
      2. In the System Properties window, click the Hardware tab.
      3. Near the top of this window, click the Device Manager button.
      4. In the Device Manager window, there is a list of hardware components which are installed on the computer. Press the Plus sign (+) to the left of the icon to open the Network adapters item in the list. The Network adapters section of the window expands to reveal a list of all network adapters installed on the computer.
      5. If you see any of these words in the list of installed network adapters, “Wireless,” “WLAN,” “Wi-Fi,” “802.11a,” “802.11b,” “802.11g,” or “802.11n,” your computer has wireless network support installed.

      If your desktop or laptop computer does not have built-in wireless support, you need to purchase a network adapter to wirelessly connect your computer to your wireless router. If you need an adapter for a desktop computer, buy a USB wireless network adapter. If you have a laptop, buy a PC card-based network adapter. Make sure that you have one adapter for every computer on your network.

      NOTE: To make setup easy, choose a network adapter made by the same vendor that made your wireless router. For example, if you find a good price on a Linksys router, choose a Linksys network adapter to go with it. To make shopping even easier, buy a bundle, such as those available from Linksys, Actiontec, D-Link, Netgear, Microsoft, and Buffalo. If you have a desktop computer, make sure that you have an available USB port where you can plug in the wireless network adapter. If you don't have any open USB ports, buy a USB hub to add additional ports.
    • A copy of your router setup instructions
      Before you begin setting up your wireless network, it’s a good idea to make sure that you have the copy of the setup instructions provided by the router manufacturer or your ISP. If you do not have a copy, visit the manufacturer’s website for get instructions on how to set up your router. All routers vary, and you may need to consult the instructions to set up your wireless network using your specific router.
    Shopping list
    After you have everything you need, follow these five steps to set up your wireless network.

    1. Connect to the Internet

    Make sure that your Internet connection and your DSL or cable modem are working. Your wireless network depends on this connection.

    2. Connect your wireless router

    These are the steps for connecting a stand-alone wireless router to your DSL modem or cable modem. If you have a modem router, follow your ISP’s instructions for connecting your network.
    Since you'll be temporarily disconnected from the Internet, print these instructions before you go any further.
    First, locate your cable modem or DSL modem and unplug it to turn it off.
    Next, connect your wireless router to your modem. Your modem should stay connected directly to the Internet. Later, after you've hooked everything up, your computer will wirelessly connect to your router, and the router will send communications through your modem to the Internet.
    Wireless router setup mapNext, connect your router to your modem:
    Note: The instructions below apply to a Linksys wireless router. The ports on your router may be labeled differently, and the images may look different on your router. Check the documentation that came with your equipment for additional assistance. Or do a Bing search on “[your manufacturer/model] wireless router setup” to find images and instructions.
    • If you currently have your computer connected directly to your modem: Unplug the network cable from the back of your computer, and plug it into the port labeled Internet, WAN, or WLAN on the back of your router.
    • If you do not currently have a computer connected to the Internet: Plug one end of a network cable (included with your router) into your modem, and plug the other end of the network cable into the Internet, WAN, or WLAN port on your wireless router.
    • If you currently have your computer connected to a router: Unplug the network cable connected to the Internet, WAN, or WLAN port from your current router, and plug this end of the cable into the Internet, WAN, or WLAN port on your wireless router. Then, unplug any other network cables, and plug them into the available ports on your wireless router. You no longer need your original router, because your new wireless router replaces it.
    Wireless modem lightsNext, plug in and turn on your cable or DSL modem. Wait a few minutes to give it time to connect to the Internet, and then plug in and turn on your wireless router. After a minute, the Internet, WAN, or WLAN light on your wireless router should light up, indicating that it has successfully connected to your modem.

    3. Configure your wireless router

    Wireless cablesUsing the network cable that came with your wireless router, you should temporarily connect your computer to one of the open network ports on your wireless router (any port that isn't labeled Internet, WAN, or WLAN). If you need to, turn your computer on. It should automatically connect to your router.
    Next, open Internet Explorer and type in the URL or address to configure your router.
    NOTE: Do this on the computer that you are using to set up your wireless network. The computer automatically links you to the router’s page. If you type the router’s URL on a different computer, typing the address in the navigation bar will not take you to your router’s configuration page.
    On the router configuration page, you might be prompted for a password. The address and password you use varies depending on what type of router you have, so refer to the instructions included with your router or on the manufacturer’s website.
    For quick reference, this table shows the default addresses, user names, and passwords for some common router manufacturers. If the address is not listed here, you can read the documentation that came with your router or go to the manufacturer's webpage to find it. There may be multiple website addresses you can use.
    RouterAddressUsernamePassword
    3Comhttp://192.168.1.1adminadmin
    D-Linkhttp://192.168.0.1adminadmin
    Linksyshttp://192.168.1.1adminadmin
    Microsoft Broadbandhttp://192.168.2.1adminadmin
    Netgearhttp://192.168.0.1adminpassword
    Actiontechttp://192.168.0.1usernamepassword
    Internet Explorer shows your router's configuration page, along with the modem IP address and other information. Most of the default settings should be fine, but you need to configure three things:
    • Your wireless network name, known as the SSID. This name identifies your network, and it appears in a list of available wireless networks. You should change the default SSID that your ISP provided and give your network a unique name that none of your neighbors are using. This helps you identify your network, and it can help keep your wireless network secure by preventing it from overlapping with other wireless networks that might be using the default SSID.
    • Wi-Fi Protected Access (WPA or WPA2), which can help protect your wireless network. It’s important to help secure your wireless network by setting up a network security key, which turns on encryption. With encryption, people can't connect to your network without the security key, and all information sent across your network is encrypted so that only computers with the key to decrypt the information can read it. This can help prevent attempts to access your network and files without your permission. Wi Fi Protected Access (WPA or WPA2) is the recommended wireless network encryption method. Wireless encryption (WEP) is not as secure. Windows 7, Windows Vista Service Pack 2, and Windows XP Service Pack 3 support WPA2.

      When you set up most routers (stand-alone routers and modem routers), you are asked to provide a pass phrase that the router uses to generate several keys. Make sure that your pass phrase is unique and long (you don't need to memorize it). Some routers and modem routers now come with a function called Quick Security Setup (or QSS) that automatically issues you a key when you press a button on the router.

      Be sure to keep a hard copy and a digital copy of your network security key and pass phrase, in case you lose or misplace them. You can recover a lost network key or reset it on your router, but these are complicated processes that are different for every router and they sometimes entail setting up your network again.
    • Your administrative password, which controls your wireless network. Just like any other password, it should not be a word that you can find in the dictionary, and it should be a combination of letters, numbers, and symbols. Be sure to save a hard copy and a digital copy of this password, too, because you'll need it if you ever have to change your router's settings.
    The exact steps you follow to configure these settings will vary depending on the type of router you have. After each configuration setting, be sure to click Save Settings, Apply, or OK to save your changes.
    Get more help making your network secure.
    Now, before connecting your computers and devices to the network, you should disconnect the wireless network cable from your computer.

    4. Connect your computers, printers, and other devices to the wireless network

    You can connect multiple computers, printers, and many other peripheral devices, such as an Xbox, Xbox 360, TV, cell phone, iTouch, or iPad, to your network. Before you connect them to your network, make sure that the computer or device you want to add has built-in wireless networking or a network adapter. Many newer devices have built-in wireless capability. If the computer or device you want to add does not have built-in wireless network support, plug the network adapter into your USB port and place the antenna on top of your computer (in the case of a desktop computer) or insert the network adapter into an empty PC card slot (in the case of a laptop). Windows automatically detects the new adapter and may prompt you to insert the CD that came with your adapter. The on-screen instructions guide you through the configuration process.
    Use the following links to find step-by-step instructions for adding your specific computer or device to your network using your operating system. There are instructions for each operating system, and they show you how to automatically or manually add wired (Ethernet) or wireless computers and how to add computers running Windows 7, Windows Vista, or Windows XP. There are also instructions for adding printers and both wired and wireless devices.

    5. Share files, printers, and more

    Now that your computers and devices are connected, you can begin sharing files, printers, games, and much more. One of the top reasons for setting up a home network is to share a printer. Another is to share files. The steps for doing this, however, aren’t always obvious, so here are instructions to get you started:

    how to value a non-compete agreement

    Often business buyers and sellers include a seller non-compete
    agreement within the business purchase terms. Because a non-
    compete covenant can be considered an acquired intangible asset
    from the seller and be amortized for cost recovery for federal
    tax purposes, a savvy business buyer needs to understand the
    importance of this business purchase agreement component.
    What is a "Non-Compete Agreement"?
    A business seller agrees to not participate or compete with the
    buyer of his business in the same market, industry, geography
    or product niche his business has historically participated for
    a stipulated period of time. When this agreement is included in
    the business purchase contract it is often called a "covenant
    not to compete" or a "non-compete" agreement. If this agreement
    meets certain conditions, it can be defined as an acquired
    amortizable intangible asset for the buyer. Consequently, it
    will be subject to specific cost recovery requirements from the
    U.S. Internal Revenue Service.
    Allocation of Purchase Value of a Business
    In many business purchase agreements, a portion of the lump sum
    purchase price is allocated to the covenant not to compete. An
    experienced business buyer, when ready to make a purchase
    offer, will be keenly aware of how best to allocate the
    purchase value of the business under consideration and what
    value portion goes to the non-compete covenant.
    The purchase price of the business will be allocated among
    various asset classifications to be purchased. Typically,
    assets are divided between tangible or "hard assets" and
    intangible or "soft assets". For illustration purposes, hard
    assets are items of physical presence and potential use in the
    operation of the business; equipment, furniture, inventory and
    vehicles. Soft assets often include goodwill, intellectual
    property and non-compete covenants.
    It is also important for the business buyer to evaluate non-
    compete agreement values because the IRS has declared that
    intangible assets, with few exceptions, must be depreciated
    over a 15 year period, more than twice as long as most tangible
    business assets.
    Changes in federal tax code have significantly reduced the
    adverse tax interests of business buyers and sellers, however
    more IRS scrutiny is put on business purchase price allocations
    to covenants not to compete because often the business buyer
    wants an unreasonably large value allocation put on the non-
    compete agreement to reduce his future tax burden made via
    higher amortization expenses in future business accounting
    periods.
    How Do I Determine a Non-Compete Value?
    A business buyer needs to define and attempt to quantify how
    much "damage" the business seller and his key associates, could
    realistically inflect on his new business if there is no non-
    compete agreement in the purchase transaction to determine a
    non-compete agreement value. Usually a thorough assessment of
    the seller's CEO and senior management can lead to a reasonable
    sales revenue loss assessment.
    A seasoned business valuation consultant can, "earn his keep" in
    this area. Converting potential revenue losses due to a lack of
    a non-compete agreement into potential earnings losses is not
    that clear cut when factoring in various fixed cost and
    variable expense ramifications and scenarios. Merely
    multiplying the projected profit margin by the potential
    projected sales reductions will not get you a valid "damage"
    assessment. A well-thought-out, comparative, discounted net
    cash flow analysis over the non-compete agreement time frame is
    fundamental to determining the fair market value of a given
    non-compete agreement.
    Determining the fair market value of a non-compete agreement is
    a complex process and is determined by many diverse elements
    related to the business buyer's perceived valuation of the
    business seller's; financial and human resources, motivations
    to compete, relationships with key existing customers and
    ability to use or access critical innovative technology or
    information.
    Obviously the term of the non-compete agreement is critical to
    the business buyer. Like a call option on a stock, the longer
    the term to contract expiration the more the business buyer
    will have to pay. Time frame determination variables to
    consider in establishing a non-compete agreement term are:
    seller reasons for sale, the span of key executives willing to
    sign non-competes, current positions of existing products in
    their typical life-cycles, expiration of key patents, the cost
    to effectively enter and compete in the targeted industries and
    the related term of seller financing in the deal.
    Finally, if you are either a seasoned business buyer or someone
    with no business acquisition experience, it is most prudent to
    use professional assistance to define non-compete covenant
    structure, valuation and amortization processes. Having proven,
    certified experts who represent "3rd party", objective opinions
    to the business seller will significantly enhance your ability
    to establish favorable purchase terms for the business you
    seek.

    How To Value A Stock

    Forget name recognition and stick to fundamentals when investing.


    You are one lucky guy if, back in 1997, you beat the crowd and bought stock in a new Internet book store called Amazon.com. Back then, if you'd ponied up $1,000 to buy shares in the firm at $2.50 each, your stake would now be worth $31,000.That's stock-picking's appeal: Buy the right company and make a bundle. But you can also wind up broke. Consider a not-so-lucky investor who bought $1,000 worth of Amazon stock at $105 a share in 1999. The shares are now worth $78 each, and the entire holding, a total of $743.
    The point is that stock-market investing is a tricky business, and on average, it is mathematically impossible for investors collectively to beat the market. Don't even try--if you do, chances are the only one who'll come out ahead is the broker who skims a commission off each of your trades.
    In Pictures: How A Billionaire Values Stocks
    That is not to say you should avoid stocks altogether. In fact, stocks offer one of the best ways to grow your savings over the long term, having returned an average of 6% annually after inflation over the past century. But rather than regard the market like a speculator--constantly swinging for the fences and often striking out--the smart thing to do is act like a long-term investor. That means either buying stocks you intend to hold on to for years or decades, or, safer still, owning low-cost index mutual funds or exchange-traded funds (ETFs).
    However you decide to invest, it helps to know the basics of valuing companies and their stocks.
    Owning a stock means becoming a fractional owner of a company. If the enterprise thrives, you get a cut of the profits, either through a rise in its stock price that reflects its growing earnings power, regular payments known as shareholder dividends, or both. If the company becomes sickly, you're likely to suffer too, as the price others are willing to pay you for its stock sinks and its dividend payments are cut or suspended to save cash.
    The varying assessments of a stock's prospects are reflected throughout the trading day in its fluctuating price. If more people want to own a stock, its price goes up. If fewer people want it, the price falls.
    Knowing whether a stock is cheap or expensive is a tricky business. The simplest measure--yet one that has proved quite useful over time--is the so-called price/earnings, or PE, ratio. It represents the current price of a stock divided by what the corporation earned for every share outstanding over the past year.
    If the stock is trading at $10 per share and the issuer earned $1 for each share outstanding over the past year, the PE ratio is 10. Over many decades, stocks have traded at a PE ratio of around 15 on average, meaning that investors have been willing to pay $15 for every $1 in net profit the company booked over the previous 12 months.


    If the PE rises above that level, it typically means investors are expecting the company's earnings per share to rise. If the PE is lower, it often means the market expects earnings to fall.
    Google ( GOOG - news - people ) is currently trading at a PE ratio of 28. The reason it's so high is that investors, in aggregate, expect the company's earnings to rise dramatically, as they have the past few years. Union Pacific ( UNP - news - people ), on the other hand, has a price-to-earnings ratio of 10 and is not expected to grow earnings much in the staid railroad business.
    When someone bought Amazon at $105 in 1999, the company did not have any earnings at all. Instead, the share price reflected investors' enthusiasm about the prospect for Internet retailers to earn big profits in the future. In retrospect, their hopes were overblown, and the prices of many e-retailers collapsed when that reality hit home.
    One way to avoid buying into similar duds is to favor companies that pay dividends. These are payments a business makes out if its earnings on a regular basis (typically once per quarter) to its shareholders. Many highly speculative stocks have no earnings and pay no dividends.
    Another reason dividends are important is that they represent roughly half the profits investors have earned on stocks over the long term. Dividend-paying stocks tend to be issued by established companies, like 
    A company's dividend is measured in terms of its yield. This is the percentage of the stock's current price that you get back through dividends. If you pay $50 for stock in a company that pays investors $2 per share in annual dividends, its yield is 4%. That's as much as you're likely to get these days in a bank savings account or from a highly rated corporate bond. If, instead, you pay $100 for a stock paying $2 a year in dividends, your yield falls to 2%.
    If high dividends sound like a good deal, consider a low-cost index fund that specializes in high-dividend stocks. Most are easy to find by screening for mutual funds or ETFs by category, or searching for funds with the word “dividend” in their names. But remember: Other investors know as much about dividends as you do.
    In the long run, owning an index fund that invests in the entire market is likely to do just as well as a high-dividend one--and a far sight better than a series of hot stock you bought based on the advice of poker buddies and cocktail-party tipsters.

    How To Value A Business

    Accurately valuing a small business is often the most challenging part of the process for prospective business buyers. However, it doesn't have to be an overwhelming or difficult undertaking. Above all, you should realize that valuation is an art, not a science. As a buyer, always keep in mind that the "Asking Price" is NOT the purchase price. Quite often it does not even remotely represent what the business is truly worth.
    Naturally, a buyer's valuation is usually quite different from what the seller believes their business is worth. Sellers are emotionally attached to their businesses. They usually factor their years of hard work into their calculation. Unfortunately, this has no business whatsoever being in the equation.
    The challenge for you, the buyer, is to formulate a valuation that is accurate, and will prove to provide you with an acceptable return on your investment.
    There are several ways to calculate the value of a business:
    • Asset Valuations: Calculates the value of all of the assets of a business and arrives at the appropriate price.
    • Liquidation Value: Determines the value of the company's assets if it were forced to sell all of them in a short period of time (usually less than 12 months).
    • Income Capitalization: Future income is calculated based upon historical data and a variety of assumptions.
    • Income Multiple: The net income (profit/owner's benefit/seller's cash flow) of a business is subject to a certain multiple to arrive at a selling price.
    • Rules Of Thumb: The selling price of other "like" businesses is used as a multiple of cash flow or a percentage of revenue.
    Let's look at each to determine what's best for your purchase: Asset-based valuations do not work for small business purchases. Assets are used to generate revenue and nothing more. If a business is "asset rich" but doesn't make much money, how valuable is the business altogether? Conversely, if a business has limited assets, such as computers and office equipment, but makes a ton of money, isn't it worth more?
    Income Capitalization is generally applicable to large businesses and most often uses a factor that is far too arbitrary.
    The "Rule of Thumb" method may be too general since it's hard to find any two businesses that are exactly the same. Valuation must be done based upon what you, as the buyer, can reasonably expect to generate in your pocket, so long as the business's future is representative of the past historical financial data. Notwithstanding this, the "Rules of Thumb" methodology is an good place to start but is a bit too broad to consider by itself.
    The Multiple Method is clearly the way to go. You have probably heard of businesses selling at "x times earnings." However, this can be quite subjective. When buying a small business, every buyer wants to know how much money he or she can expect to make from the business. Therefore, the most effective number to use as the basis of your calculation is what is known as the total "Owner Benefits."
    The Owner Benefits amount is the total dollars that you can expect to extract or have available from the business based upon what the business has generated in the past. The beauty is that unlike other methods (i.e. Income Cap), it does not attempt to predict the future. Nobody can do that. Owner Benefit is not cash flow! It is, however, sometimes referred to as Seller's Discretionary Cash Flow (SDCF).
    The theory behind the Owner Benefit number is to take the business's profits plus the owner's salary and benefits and then to add back the non-cash expenses. History has shown that this methodology, while not bulletproof, is the most effective way to establish the valuation basis of a small business. Then, a multiple, based upon a variety of factors, is applied to this number and a valuation is established.
    The Owner Benefit formula to use is:
    Pre-Tax Profit + Owner's Salary + Additional Owner Perks
    + Interest + Depreciation less Allocation for Capital Expenditures
    Why Add Back Depreciation? Depreciation is an expense that allows a business to deduct a certain amount of money each year from an asset so that its purchase value is reduced by its overall useful life. As an example: if the business buys a $25,000 truck and its useful life is estimated at 5 years, then each year the company can deduct $5000 off its income to lessen its tax burden. However, as you can see, it is not an actual cash transaction. No money is physically leaving the business or changing hands. Therefore, this amount is added back.
    Why Add Back Interest? Each business owner will have separate philosophies for borrowing for the business and how to best use borrowed funds, if necessary at all. Furthermore, in nearly all cases, the seller will pay off the business's loans from their proceeds at selling; therefore, you will have use of these additional funds.
    A Note About Add-Backs After completing any add-backs, it is critical that you take into consideration the future capital requirements of the business as well as debt-service expenses. As such, in capital intensive businesses where equipment needs replacing on a regular basis, you must deduct appropriate amounts from the Owner Benefit number in order to determine both the true value of the business as well as its ability fund future expenditures. Under this formula, you will arrive at a "net" Owner Benefit number or true Free Cash Flow figure.
    What Multiple? Typically, small businesses will sell in a one-to three-times multiple of this figure. Now, this is a wide range, so how do you determine what to apply? The best mechanism I have found is that a one-time multiple is for those businesses where the seller is "the business." In other words: "as out the door goes the seller, so too can go the customers." Consulting businesses, professional practices, and one-man businesses come to mind.
    Businesses that have a strong track record, repeat clients, historical pattern of growth, more than 3 years in business, perhaps some proprietary item, or an exclusive territory, a growing industry, etc., will sell in the 3-times ratio. The others fall somewhere in-between.
    So now the big question: what number/multiple do you apply to the Owner's Benefit number? The answer is simple: nearly all small businesses will sell in the 1-to-3 times Owner Benefit window. Of course, this is a very wide range.
    Also, the actual total Owner Benefit figure will impact the multiplier. As the Owner Benefit number increases, so too will the multiple. As an example, a business generating $200,000 in OB, may be worth a 3 times multiple, but one generating $500,000 or $1,000,000 can be worth a four or five times multiple.
    The Rules to Apply To Establish A Multiple: You also want to calculate the Return on Investment (ROI) that you can expect to achieve when buying a business. Let's say that you have $100,000 for a down payment. If you go to Las Vegas and let it rip on "17 black," well you should be entitled to enormous odds. Wouldn't you agree? On the other hand, if you invest it in commercial real estate, which is a solid, stable investment, then 10% return on your money seems about right, doesn't it? In fact, when the real estate market heats up, the return cvan diminish to 5% or so, and still investors are satisfied.
    Buying a business is clearly a greater "risk" but definitely far less than gambling it at a casino and so you should expect something in-between. I've always felt that a 25% return on your investment should be the minimum and you can, if negotiated well, get as high as 35% -50% ROI.
    If You're New At This, Here's What To Do:
    • If you don't know how to read an income statement, then learn. It's important for this process. It's simple, and can be done quickly.
    • Work with your accountant, if necessary, to determine the true Owner Benefits of the business. Be careful about the add-backs. Make certain that any benefits being added back are not necessary expenses needed to run the business.
    • You can only add back something that has been expensed.
    • Calculate a multiple in the 1-3-times window based upon the business's strengths and weaknesses. Note that the multiple will increase along with the Owner benefit figure.
    • Determine your investment level and an acceptable ROI.
    • Understand that value is personal.
    • If the business is right for you, it is all right to pay a slight premium, but not to drastically overpay.
    • Consider applying other valuation formulas simply as a test to your figure.
    Professional Valuations: Do You Need One? For most small businesses, hiring a professional to perform a valuation is not necessary. First of all it is expensive, and more often than not, it simply does not reflect reality. I read a valuation recently on a local company handling specialized telecom components in a very restricted marketplace doing $700,000 a year in sales and netting $100,000. The valuation started off: "The company is focused upon the specialized B2B telephony arena and operates within a broad industry which generates annual revenues of $42 billion in North America. Leading competitors include Nortel, Cisco….." I threw out the entire report after reading that one sentence. Why? How on earth can you possibly compare a $42 billion dollar industry and a $700,000 local distributor of telephone systems? Don't waste time or money getting a professional valuation done for a small business acquisition. Let the seller do that if they so choose. If you want to look at a variety of scenarios, there are some very good, inexpensive software packages available that will do the same thing at a fraction of the cost.
    The Key Points:

  • Remember that valuations are not scientifically based; they're subjective.

  • Use a variety of methods.

  • Owner Benefits is the number on which to base your multiple

  • Uncover how the seller established the asking price

  • Valuation is a personal formula - What's the business worth to YOU?

  • Consider the potential return on your cash investment

  • How to install drivers in windows XP

    Drivers are the brains that show hardware how to function. In this article I will show you how to install drivers for most any hardware. Some very common driver installations are for network adapter, wireless adapters, CD-ROMS, Hard Drives, Video Cards, and Printers.


    Right-Click MY COMPUTER

    Click MANAGE.


  • 3
    Highlight DEVICE MANAGER.

  • 4
    Choose the hardware category your hardware relates to and click the + symbol next to it.

  • 5
    Now Right-Click the specific device you would like to install the driver for and click PROPERTIES.

  • 6
    Click the DRIVER tab located at the top of window.

  • 7
    Click UPDATE DRIVER and browse to location where driver files reside. This will install a new driver or update an existing driver for your H/W.

  • 8
    At times, you will see devices in the UNKNOWN DEVICES category. Devices here are hardware recognized by windows, but have no existing drivers installed. It is the same procedure to install drivers for these devices as mentioned in STEP 7.

  • Highlight DEVICE MANAGER.

    Choose the hardware category your hardware relates to and click the + symbol next to it.

    Now Right-Click the specific device you would like to install the driver for and click PROPERTIES.
    Click UPDATE DRIVER and browse to location where driver files reside. This will install a new driver or update an existing driver for your H/W

    At times, you will see devices in the UNKNOWN DEVICES category. Devices here are hardware recognized by windows, but have no existing drivers installed. It is the same procedure to install drivers for these devices as mentioned in STEP 7.


    .


  • 2
    Click MANAGE.

  • 3
    Highlight DEVICE MANAGER.

  • 4
    Choose the hardware category your hardware relates to and click the + symbol next to it.

  • 5
    Now Right-Click the specific device you would like to install the driver for and click PROPERTIES.

  • 6
    Click the DRIVER tab located at the top of window.

  • 7
    Click UPDATE DRIVER and browse to location where driver files reside. This will install a new driver or update an existing driver for your H/W.

  • 8
    At times, you will see devices in the UNKNOWN DEVICES category. Devices here are hardware recognized by windows, but have no existing drivers installed. It is the same procedure to install drivers for these devices as mentioned in STEP 7.

  •