Showing posts with label Internet. Show all posts

Friday, March 4, 2011

How To Advertise on the Internet Successfully

Internet or online marketing has now become the most popular way to get your business more exposure. Yes, TV and radio are still viable mediums however; campaigns using these can greatly make a dent on your operating capital. Advertising and marketing through the Internet is the most cost-effective solution especially if you are looking at long term success. Let’s face it, leveraging the millions of users logging onto the Internet at a lower budget is more enticing to any business then going for the more expensive TV and radio commercials. The only problem with advertising on the Internet is that it needs a lot more strategizing and analysis if you want to achieve success in the quickest amount of time.

  • Determine a budget. You probably know by now that you can actually advertise and run a comprehensive marketing campaign online for free or at most, at a significantly low cost. This is true however; these free and cheap strategies can only bring you success momentarily. If you want staying power and long term success, you will definitely need money to do so. Don’t worry; it still should be cheaper than running a TV marketing campaign. These being said, make sure to finalize a realistic budget for your online marketing. The budget should consist of expenses to go to a pay per click campaign on various search engines, graphic and web design costs for your websites and advertising banners, and labor costs to spearhead and manage your online marketing efforts.
  • Create a website and blog. If you don’t have a blog and website yet for your business, then you need to get one up and running as soon as you can. Do the website first. Hire a superior web designer with high level graphic design skills to create your website for you. Hire a web content writer to create the content for you site. Once that is done, move both people to create and maintain your blog. The blog is useful in sharing relevant content to your fan base. This will increase retention and exposure with a non-direct marketing approach. Make sure the website and blogs are interlinked to each other to redirect traffic from one site to the other and vice versa. 
  • Create a pay per click campaign. Google Ads should always be your best bet since Google is the most popular search engine today. Create a complex advertising campaign on Google ads and have someone manage this campaign for you. Make sure to do your competitor and website ranking analysis prior to starting your campaign so you know what keywords to invest in.
  • Use social media. The biggest trend in online marketing that has proven to be quite successful is social media marketing. This means that you will use the Facebook, Twitter, YouTube, MySpace, and LinkedIn to promote your business. It is highly recommended to hire a social media marketing consultant to create your marketing strategy for these platforms. Hiring a team to work on this campaign would be a great idea as well. The labor can be cheap since you can hire a virtual staffing company to do the work. Allow the social media consultant to choose the team to work for you.
Aside from these online marketing strategies, you can get more traffic to your site regularly by constantly uploading new content relevant to your niche to online article directories and video streaming sites. You may consider buying up ad spaces on websites that constantly get high hits or traffic daily however, this may be an expensive advertising option


How do I clear my Internet browser history?

Microsoft Internet Explorer users
Note: Users running Internet Explorer 7.0 and above will need to press the Alt key in order to access the file menu easily to get access to options such as File, Tools, etc.
Viewing History
  • Microsoft Internet Explorer 7 and above users can view their history files by clicking the "Tools" menu, "Internet Options", clicking the "Settings" button under the Browsing history, and then clicking the "View Files" button.
  • Microsoft Internet Explorer 6.x users can view their history files by clicking the "Tools" menu, "Internet Options", clicking the "Settings" button, and then clicking the "View Files" button.
Deleting History
  • Microsoft Windows users running Microsoft Internet Explorer 6.x and 7.x can delete their history files by clicking the "Tools" menu, "Internet Options", and clicking the "Delete Files" or "Delete" button. Users also have the option of automatically deleting files each time the close the browser window by clicking the "Advanced" tab and checking "Empty Temporary Internet Files folder when browser is closed" under the "Security" section.
  • Microsoft Internet Explorer 4.x users on an Apple Macintosh can delete the history by clicking the "Hard Drive" icon, "System",  "Preferences", "Explorer", and moving the history file into the trash.
  • Microsoft Internet Explorer 3.02 and lower users can delete their history by clicking the "View" menu, "Options", open the tab "Advanced", click the "Settings" tab, and click the "Empty Folder" button.
Mozilla Firefox users
Viewing History
Press Ctrl + H to open the left-side history bar.
or
Click History at the top of the window.
or
Users using earlier versions of Mozilla Firefox can also view their history by clicking "Go" and clicking "History."
Deleting History
Mozilla Firefox users can clear their history by clicking the "Tools" menu, "Options", clicking the "Privacy" button, and under "History" click the "Clear" or "Clear Now" button.
or
Press CTRL + Shift + DEL to open the Clear Data Window.
Netscape users
Viewing History
  • Microsoft Windows users can view history by first opening Netscape and click the "Edit" menu, "Preferences", "History", and view the location where Netscape is storing your files. Next, open this folder within Explorer.
Deleting History
  • Netscape users can delete their history files by clicking the "Edit" menu, "Preferences", "History", and click the "Clear History" button.
Opera users
Viewing History
Click Help and then About. Within the About Opera window you'll see the full path to where the cached files are stored. Browse to that file path to view cached files.
Deleting History
Opera users can delete their history by clicking the "File" menu, "Preferences", "History", and click "Empty now" button. In addition, users can check "Empty on exit" if they wish for this task to occur each time they exit the browser.

How to Block a Website

Internet Explorer version 5 and later offer the ability for heighten security and privacy. You can block a site by following the directions below:
1. Load your Internet explorer
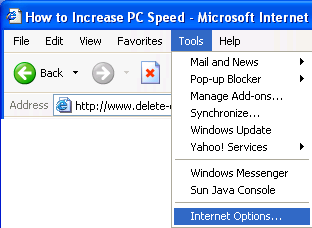
2. Click Tools
3. Click Internet Options
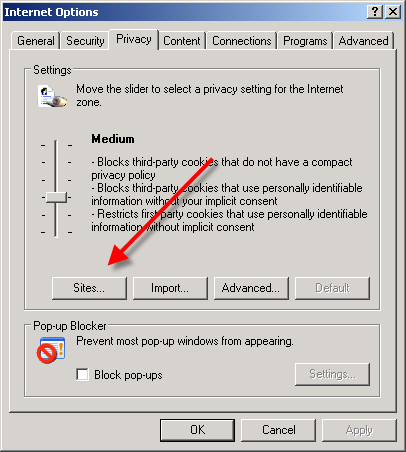
4. Click the Privacy tab
5. Under the Privacy window, Click Sites
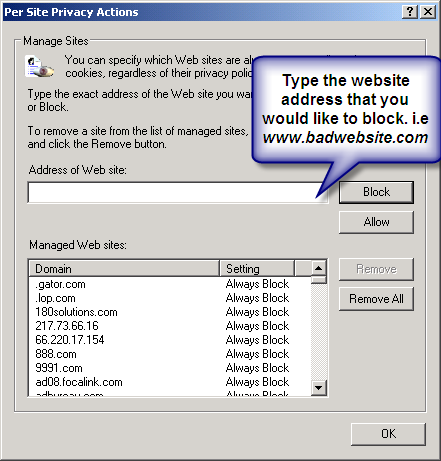
6. Type in the site address that you want to Block and Click OK. Remember this technique only blocks on one site at a time. Parental control software will allow you to block multiple sites and categories.


Block a website step 1


block a website step 2


Here are alternate instructions to block a website using Internet Explorer.
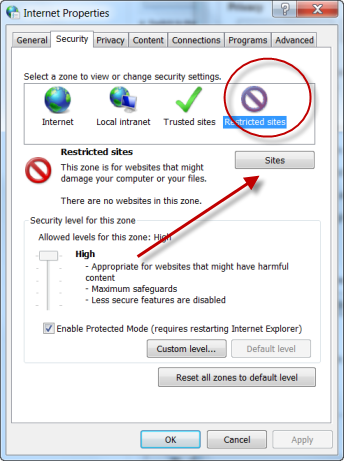
Tools ->Internet Options->Security->Restricted sites->Sites->Type in the site address and Click ADD then click OK

How to Restrict a Website using Firefox

Firefox requires an add-on to restrict sites. You can find many good ones at Mozilla.org. The best one is BlockSite.

Here is How:
1. In Firefox, click Tools
2. Click Add-ons
3. Click Get Add-ons
4. Choose Browse All Add-ons.
5. Type blocksite in the search bar.After installing the add-on you will be able to block sites with just a few clicks.

How to block a Website using Google Chrome

1. Open your Chrome Web Browser
2. Click the wrench symbol in he upper right corner.
3. Choose Tools
4. Click Under the Hood tab.
5. Choose Change Proxy Settings.
6. Click Security, click Restricted Sites
7. Double click Sites and add the site you want block


google chrome block


How to Block A Website in All Web Browsers


This action will require you to edit your Host file. Your host file is a computer file used to store information on where to find a node on a computer network. For more a more detailed description. Check out this link Host File Description Link
In Windows XP
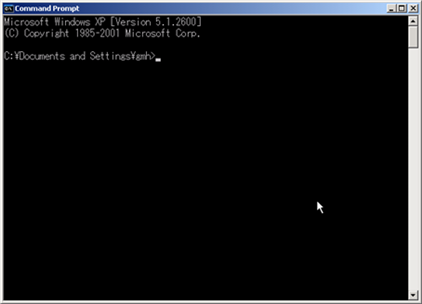
1. Click Start->All Programs->Accessories->Command Prompt.
2. Click Command Prompt This will open a DOS command window.
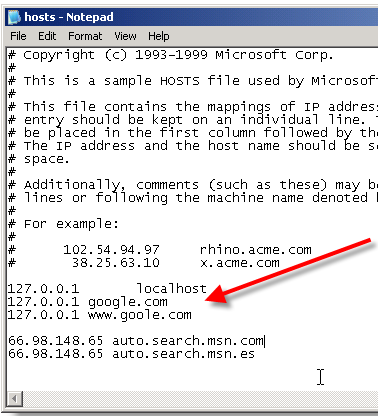
3. Type: notepad C:/Windows/System32/drivers/etc/hosts
4. Locate the line 127.0.0.1 localhost
5. To block the website google.com for example, just add this text under 127.0.0.1 localhost:

127.0.0.1 google.com
127.0.0.1 www.google.com
You can add as many sites any site, However you will need to prefix it with "127.0.0.1".

6. Save the file
Google will now be blocked in all web browser. This is an advanced but easy method on how to blow a website.


block a website step 3


block a website step 4

How to Enable JavaScript in Internet Explorer

Note To allow scripting on this Web site only, and to leave scripting disabled in the Internet zone, add this Web site to the Trusted sites zone.
  1. On the Tools menu, click Internet Options, and then click the Security tab.
  2. Click the Internet zone.
  3. If you do not have to customize your Internet security settings, click Default Level. Then do step 4
  4. If you have to customize your Internet security settings, follow these steps: a. Click Custom Level. b. In the Security Settings – Internet Zone dialog box, click Enable for Active Scripting in the Scripting section.
  5. Click the Back button to return to the previous page, and then click the Refresh button to run scripts.
Mozilla Corporation’s Firefox version 2
  1. On the Tools menu, click Options.
  2. On the Content tab, click to select the Enable JavaScript check box.
  3. Click the Go back one page button to return to the previous page, and then click the Reload current page button to run scripts.
Opera Software’s Opera version 9
  1. On the Tools menu, click Preferences.
  2. On the Advanced tab, click Content.
  3. Click to select the Enable JavaScript check box, and then click OK.
  4. Click the Back button to return to the previous page, and then click the Reload button to run scripts.
Netscape browsers
  1. Select Edit, Preferences,Advanced
  2. Click to select Enable JavaScript option.

How to Make Money on the Internet

Hi there! On this blog, I share my internet marketing experiences. I have been involved in the this field for over 4 years now and over time I have acquainted myself with nearly all areas of this field: From blogging to affiliate marketing.

You have most probably landed on this website with hopes of making money online. I have compiled a list of beginners’ articles and tutorials from this blog that you can go through. Below are some of the most helpful articles:
These are just a few of the beginners' articles on this blog. Drop by the archives section or check the categories for more posts. Subscribe to the blog by feed or email to stay updated with new posts on the blog. :

Wednesday, March 2, 2011

How do I get wireless internet?

Wireless internet is not just "out there" for you to connect up to. You need to take steps, whether it's setting something up, paying for something, or at a minimum, asking for permission.
It's definitely not the case that you can just grab a wireless card and suddenly be connected anywhere you want. The wireless capabilities of your computer are only half of what's needed.
There are several approaches to getting a wireless internet connection.
WiFi
WiFi is a medium range wireless networking protocol. By medium range, I mean that its range is typically around 30 to 300 feet, depending on conditions. That means it's something you need to be fairly close to.
The most common WiFi setup is to get a WiFi router or access point, and connect it to your own wired internet connection. For example, you might upgrade and get a DSL connection, and then place a WiFi router on that connection so that you can get the internet wirelessly anywhere in your home.
The second most common WiFi setup is the public WiFi hotspot. This is exactly the same as what I've described you do in the home: the hotspot owner has a wired internet connection to which they've connected a WiFi router or access point, and explicitly left it in the unsecure open mode for anyone to use.
"The most common WiFi setup is to get a WiFi router or access point, and connect it to your own wired internet connection."
The key take-away here for WiFi is that it's not everywhere - you need to either setup a WiFi access point yourself that connects to your wired internet connection, or you need to be close enough to a free hotspot to make use of it. (More on that below.)
WiMax
WiMax is a longer range wireless technology; its range is typically measured in single digit miles. Much like cellular, which I'll discuss in a moment, WiMax uses a network of transmitters (equivalent to WiFi access points, but much more powerful) to give a large geographic area of coverage.
You get WiMax by signing up for WiMax service with a provider. They'll then provide you with the hardware and account necessary to connect up. The WiFi ability of your laptop has nothing to do with this; WiMax is a different technology.
Right now WiMax appears to be struggling, but for business, not technical reasons as I understand it. Coverage is limited and prices, last I checked, are quite high for the average consumer.
Cellular
The cellular phone network is, essentially, a large digital network so it's no surprise really that it can be used for internet connectivity as well. The coverage area is perhaps the largest of all - pretty much anywhere your cellular phone will work. It's not as fast as WiFi or WiMax, but that's improving over time.
Like WiMax you'll typically need to sign up for a data plan with your cellular carrier, and also like WiMax you'll need additional hardware - your WiFi capability has no relationship to cellular. The additional hardware might be as simple as a cable or Bluetooth connection to your existing phone, or it might be an additional cellular network adapter for your computer.
There are also third parties such as Clearwire who use the cellular network to provide wireless internet without involving your cell phone or requiring that you sign up with a cellular provider. For a monthly fee, they provide a small box that looks somewhat like a wireless access point that handles all the magic of connecting up to the cellular network to provide connectivity.
BlueTooth
No, it's not an option, but I have to mention it because many people seem to think it is, since it's "wireless".
Bluetooth is an extremely short-range wireless connectivity technology. By extremely short range, I mean 10-30 feet. Just far enough to connect to, say, your wireless keyboard or mouse. It is not a means to get wireless internet connectivity. When it's used in conjunction with something like your cellular phone, it's the cellular network that's providing your internet. Bluetooth is just providing that last hop between your cell phone and your computer.
"But I can connect without having done any of that."
This is typically the response I get, "proving" I'm wrong, and that there must be WiFi everywhere.
Take the original question: "I can get on the internet from my iPod at the edge of my property".
That's not terribly surprising. The iPod uses WiFi, and chances are there's simply an open WiFi access point close enough to that side of your property so as to be in range.
The point is that it's someone else's WiFi.
Do you have permission to use it?
Someone else is paying for it. They're presumably paying for a wired connection and have purchased the hardware to set up the WiFi access point. Just because you can connect doesn't mean that it's appropriate for you to do so. (In some cases it might even be illegal.)
Even if it's an open WiFi hotspot - perhaps a coffee house - it's their connection and they set the terms. Typically their terms are such that the WiFi is provided for their customers, not just "anyone in range".
If it's a neighbor ... well, they should have set up encryption to prevent just this scenario, but even if they didn't that doesn't mean it's appropriate for you just to connect.
Ask first.
If they give you permission, then your solution might be to try a WiFi repeater or range extender in your home, or getting a larger antenna on your wireless device. I'll caution that this isn't always simple. Wireless networking seems to be partly magic, but it's the direction I'd steer you in once you had permission to do so.
But remember, if you're using someone else's internet connection they can monitor your traffic.
In the long run, my actual recommendation is to upgrade to DSL and get a WiFi router of your own.
Be sure to password protect that WiFi connection so that someone doesn't steal your internet connection because they just happen to be close enough.

How To Change font size of web page text in Internet Explorer and Firefox web browsers

The quickest way to change font size in both Internet Explorer and Firefox- if you have a mouse with a scroll wheel (who doesn't?)

An IBM mouse with a scroll wheel that can be used to change the font sizes of web page text Changing font sizes in both Internet Explorer and Firefox using the scroll wheel on the mouse is definitely quick and easy, especially when you don't want or don't like to tinker around with browser menu options or keyboard shortcuts.
Hit the Control key and keep it pressed. Now, move the scroll wheel and see what happens - scrolling the wheel away from your hand will decrease the font size while if you scroll it towards your hand, the font size will increase.
A few points to remember. Internet Explorer will let you resize the fonts to 5 sizes - Largest, Larger, Medium (the default), Smaller and Smallest. Firefox, however, has a wider range and lets you decrease the font size till it becomes illegible or enlarges it so much that you see only one word on the screen (I've done this).
By the way, Internet Explorer 6.xx (under Windows) has an issue with web sites on which the font sizes have been set with the px unit of measurement. The browser does not let you change the font sizes on such web sites. I don't think this is a bug because the very idea of putting text in px units is not to let visitors change the font sizes.

What if you don't have a mouse with a scroll wheel? Use the browser menu or learn the keyboard shortcuts

Another way to change font sizes of text on web pages in Internet Explorer and Firefox is through the View menu.

Internet Explorer

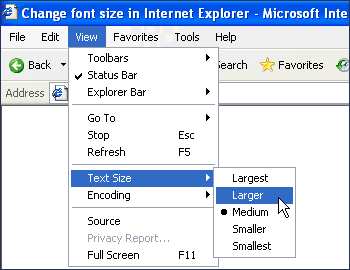
Click on View from the top menu and move down to Text Size. You can now change the text to one of the five sizes - Largest, Larger, Medium, Smaller and Smallest. (Refer image below). Internet Explorer lets you change the font size to only one of these five values.
Change the font size of web page text in Internet Explorer using the View menu
You can also accomplish the same using keyboard shortcuts. ALT-V would bring up the View menu. Clicking on the "x" key would open the Text Size menu. You can now use the up and down arrow keys and finally click on "Enter" once you have made your selection.

Firefox

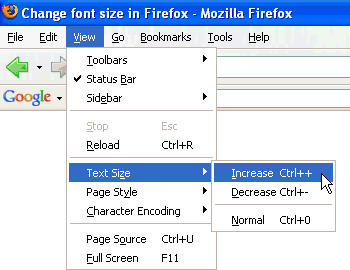
From the View menu, choose Text Size and then select whether you want to increase or decrease the font size. (Refer image below)
Change the font size in Firefox using the View menu
The keyboard shortcuts for changing the font size of text on web pages in Firefox are much simpler than Internet Explorer. Keeping the CONTROL key pressed, click on the "+" key to increase the font size and "-" key to decrease the font size. I know I couldn't resist the temptation myself, but don't play around much with this feature else you can get a splitting headache. Since Firefox allows you to change text sizes across a wider range than Internet Explorer, I suggest you use the keyboard shortcuts on this browser.

Monday, February 28, 2011

how to change password in gmail


Changing your password

Here's how to change your password:
  1. Sign in to Gmail.
  2. Click the gear icon at the top of any Gmail page, then Mail settings, and open the Accounts and Import tab.
  3. In the 'Change account settings' section, click Change password.
  4. In the new window, enter your current password and your new password.
Make sure you create a unique password to help keep someone from breaking in to your account. Here are a few tips for creating your password, and keeping it safe:
  • Never tell anyone your password.
  • It should be easy for you to remember without being obvious for someone else to guess.
  • Never write down your password. Even though your password will look random to others, think of a way to remember it so that you don't have to write it down.
  • Change your password periodically.
  • Don't choose a dictionary word as your password. Be creative.
  • Include punctuation marks. Mix capital and lowercase letters. Use numbers. A variety of characters makes it harder to guess a password.
If your password isn't working, you'll need to go through our password recovery process. Google Apps users, please contact your organization's IT admin for help with password recovery.

Friday, February 25, 2011

how to create a twitter account ?

How to create an account:

  1. Navigate to http://twitter.com/ and click the yellow button on the right hand of your screen, or simply navigate to https://twitter.com/signup.
  2. Fill in the first field with your full name.
  3. Select a username. Try to pick something that describes you - whether it's a nickname, an interest or a hobby.
  4. Enter a password. Be tricky! Make sure your password contains letters, numbers, and symbols.
  5. Enter your email address.
  6. Fill in the Captcha to prove you're human, not a machine!
  7. Pick sources that interest you (more on this below).
  8. Search for Friends, and follow them.

Tip: Choosing a Username

Your username is the name your followers use when sending @replies, direct messages, or Retweets. It will also form the URL of your home timeline. Please note: You can change your username in your account settings at any time, as long as the new username is not in use. Usernames must be fewer than 15 characters in length, and cannot contain 'admin' or 'twitter' in order to avoid brand confusion.

Tip: Entering Your Email

We use this to confirm your account before you can finish the signup process. Be sure to enter an email address that you actively use. Emails can only be tied to one Twitter account at a time in our system.
Screen_shot_2011-01-12_at_10.20.46_AM.png

1. Finding Sources That Interest You

Twitter is more useful and fun when you're getting regular updates relevant to your interests, so try the following:
  1. Select some of your interests from the left-hand side of the screen.
  2. Browse the sources listed accounts you might like to follow. (A new list of suggested sources is generated every time you click an interest.)
  3. Clicking the 'follow' button next to a user's name will add them to the list of users you are following. This is indicated by the number in the green square above the list.
  4. After you've followed users suggested in one area of interest, select another and find more sources to follow!
  5. When finished, click the blue 'Next: friends' button in the lower right hand side of your screen.
sourcestofollow.jpg

2. Getting Personal: Contact Import

If you choose, Twitter can scan your email address book in order to find contacts that are also using Twitter. It's a fast and easy way to find your friends.
  1. Simply type your email address and your email password into the boxes, then hit 'Find friends.' Twitter does not store your login, and we will not use your email address without your permission.
  2. When you see a list of the friends and colleagues found in your address book, follow them!
    • Follow all of them by selecting the blue 'Follow All' button on the right hand side of the results
    • Or if you'd like to see updates only from specific people, you can choose to ask to follow your email contacts individually using the grey 'send request' button next to their information.
  3. Click the 'Next: others' button at the bottom of your screen.
  4. A box will pop-up with your remaining contacts who are not on Twitter. To invite them to join Twitter, check the boxes next to the contacts you wish to invite - or click "select all" at the top.
    Please note: if you click 'select all' and proceed, it will invite all contacts in your address book.

usersyouwannafollow-1.jpg

3. Finding Friends with Twitter Search

To complete signup, search for anyone else you would like to add on Twitter. This example will demonstrate searching for Biz Stone, who did not show up in my contact import.
  1. Type the name of the person you're searching for into the search box.
  2. A list of matching accounts will show. Click the 'Follow' button next to any you wish to begin Following. A confirmation message will appear.
  3. When finished, click the blue 'Next step: you're done!' button to finish the sign up process. You will be taken to your home page, known as your timeline, where you can now share information via Tweets, as in the example shown below.
  4. Press 'update' and you've successfully posted your first Tweet. Congratulations and welcome to Twitter!
Fig. 11 - finding users via name search
IFoundBiz-1.jpg

how to upload videos on facebook ?

Make sure the video is encoded in one of the following formats:
QuickTime Movie (mov)
Windows Media Video (wmv)
AVI Video (avi)
MPEG Video (mpg, mpeg)
Windows Media Video (asf)
MPEG-4 Video (mp4, mpeg4)
Mobile Video (3gpp, 3gp, 3g2)
Matroska Format (mkv)
Flash Player Video (flv)
DVD Video (vob)
Ogg Format (ogm)
Nullsoft Video (nsv)

you need to add the Video application to your account. You can find this application here, you can click this link after you log in.
http://www.new.facebook.com/apps/applica…

Once you have this application, follow these steps to upload a video:

1-Go to your profile.
2-Select the Wall tab.
3-Click 'Video' inside the Publisher box.
4-Select which type of video you'd like to make.
5-Follow the on screen directions for your particular upload type.

When you're done, click "Post" to generate a story about your video and store the video permanently in My Videos

how to learn computer basics online ?

Welcome to a short, easy-to-master, web based course on basic online skills. Our goal is to give you a solid foundation. Once you have understood these basics, you will have a clear understanding on which to build your future knowledge of and skill with computers and the Internet.
This course is divided into four separate modules: Computer Skills; E-Mail Skills; Word Processing Skills and Web Skills. Each module is self-paced and includes review questions so you can check how much you have learned.
To begin, click on any of the four module links below:
Computer Skills | E-Mail Skills | Word Processing Skills | Web Skills

how to shop using paypal ?

PayPal is a money transfer site which allows an individual to send funds to others or make online purchases. PayPal is a popular site for transferring money online, but learning how to use PayPal will ease transactions.

PayPal is an online financial middleman that facilitates the transfer of money between people and businesses online. Users only need to share private financial information with PayPal, not unknown parties. PayPal can be used to buy things online, shop on eBay, or receive money from friends. There are three different types of PayPal account – Personal, Premier and Business

A PayPal account can receive money as soon as it has been created, but to use it to send money or to buy products online, the user needs to set up a means of getting funds into the account. Normally the PayPal account is linked to an existing bank account, or to a credit or debit card.

Paypal has been subject to scams and security issues which the user needs to be aware of. Paypal can also be linked to software such Quicken, Skype and Facebook.

Tuesday, February 22, 2011

how to capture streaming video


Many websites like YouTube use a Flash Video format that enables highly-compressed streaming video to effectively play in most browsers. However, the inconvenience with this type of format is that you will not be able to download it by using your Save target  option.

There are three common ways available to download/capture/save streaming videos online to your computer:

1. Using download-helper websites
2. Capture the video using a Firefox extension
3. Save the video by using commercial softwares.

Download-helper Websites


KeepVid and YouTube Downloader are download-helper websites that allow users to provide them with the video links. These videos will hence be catalogued and uploaded to the site. They are not video hosting websites like YouTube or Dailymotion; they provide a browser-based service from as the user only has to enter the video̢۪s URL in the field provided and choose its source from the list. The file formats in FLV can be converted into Mpeg video formats on Keepvid.

Download Links:

KeepVid: http://keepvid.com/
Youtube Downloader: http://www.youddl.com/

Firefox extension


Mozilla Firefox is a web browser that allows you to grab online videos with its additional Video Downloader extension. This application runs both on Windows and Mac OS X operating systems.

Mozilla Firefox 3.1 can be downloaded at: http://www.mozilla.com/en-US/firefox/

Install Mozilla Firefox

1. Choose Save when the file download window opens and select the path where you want the set up extension to be saved in.

/s/image-http-img292-imageshack-us-img292-7757-step1pf7-png

2. When the download is completed, Click Open
3. This will prompt theSet Up Wizard and you will be free to make all the necessary changes concerning its installation. If you do not want to make any changes to the installation settings, check the box labeled â€Å“I agree to the terms and conditions of the program” and proceed by clicking Next until installation completes.

/s/image-http-img247-imageshack-us-img247-5842-step3pu7-jpg

Install Mozilla Firefox Video Downloader

When Firefox's installation is complete, you can now download the Video Downloader extension at https://addons.mozilla.org/en-US/firefox/addon/3006

1. When prompted to download the software extension, click Save
2. From the Mozilla Firefox folder in your â€Å“Program Files” save the add-on in the â€Å“Extensions” folder.
3. When download is complete, choose â€Å“Close”
4. When you will open the Mozilla Firefox browser window, it will ask you if you want to install the add-on. Click â€Å“Install Now”
5. After installation, the toolbar should have the /s/image-http-img291-imageshack-us-img291-9796-3006gy3-png icon located to the left-hand side of your address bar.
6. You should first load the page containing the video stream to use this option. Once you have loaded the right page, click on the down arrow next to your video downloader icon and choose the format you want to save the video. By default it will save it as an FLV format file.
7. Choose the path where you want the video to be saved to.

Note: Winamp̢۪s latest versions can play FLV format files. You can download the program at: http://www.winamp.com/player

Sunday, April 25, 2010

Step 1
Start at the homepage. When you go to Facebook.com, you see a screen that asks you to login or sign up for a free account. Click on "Sign Up," which takes you to a Web form.
Step 2
Fill out the form that asks for your full name, your current status, email address, a password and your birthday. You'll also have to type in a series of letters and numbers for a security check as well as check a box saying that you understand and agree to the terms of use and privacy policy. Click the "Sign up now!" button when you have completed the form.
Step 3
Wait for your confirmation email. Facebook sends this email to confirm your registration. When you get the email, click on the link in the email to confirm that you did in fact register for a Facebook account. You will then be logged into Facebook.
Step 4
Search for friends and coworkers. When you first set up a Facebook account, you have the opportunity to search your email address book for possible friends and contacts. Type in your email address and password to do a search, or try searching by school or company.
Hopefully it helps you out.

Thursday, February 25, 2010

How to download youtube video ?

1) (If you don't know how to copy youtube video URL, please go to our main page to read our step-by-step guide first)

2) Enter the YouTube Video URL in the above field

3) Click "Get Link" , a new link will appear

4) Click the "download" link. It will pop up a new window.

5)You may see a message to ask you install Java2 JRE. Please click here and then click "Free Java Download" to install Java2 JRE

6) After download the video, You must have a FLV player in order to play the newname.flv file on your computer.
Download the FREE FLV Player here. (You can skip this step if you just want to watch it on your other devices such as handphone or IPod.)


7) If you want to play it on Sony PSP, Ipad, Ipod, Zune, Iphone, Black Berry, mobile phone or convert to other formats such as AVI, MP4, 3GP, WMV etc, you must download FLV Converter

8)If you are facing problem to download video by using above field, please download this all-in-one Youtube mate software. This software can download video from youtube and play the video directly.

Sunday, February 21, 2010

How to Get Internet Jobs

How to Get Internet Jobs

If you'd like to work from home, you'd probably love to find a job on the Internet, right? After all, if you can work on the internet, you should be able to work from the comfort of your own home instead of going in to an office or work place each day. And it's this same reason that many people are always on the lookout for internet jobs they can do.

Now, there are actually many jobs on the internet, but they're not always easy to find, and they might not always look exactly like you'd expect them to. Many internet jobs for instance, are not technically jobs that you get a steady paycheck for. Instead, most jobs on the internet tend to be temporary work, and work for freelance contractors. This allows companies to hire people for completing their jobs on the internet, without having to pay them a full time salary with benefits.

Many internet jobs also involve providing a service of some kind. Writing is a common job that can be found on the internet for instance, and being a writer usually means you'll need to create custom content for your internet jobs, clients, or employers. Programming is another common job done on the internet, and so is customer or technical support - all of which involve providing some level of service or another.

There are plenty of jobs which allow you to work on the internet, but those often involve reporting for work as scheduled at a specific office or workplace location. With these jobs, your clocked in for a the required eight or ten hours a day, sitting at a desk in a cubicle, and using your employers equipment.

Most people who want to find a job on the internet though, really want to find internet jobs that let them work from home, set their own hours, and maybe have more time for their families. If this is the type of internet job you're looking for too, then you'll need to modify your definition of a job slightly.

To get jobs on the internet, you have to be willing to become a freelancer or independant contractor. Now there are exceptions to this rule, but those opportunities are very rare, so we're discussing internet jobs in the general sense here.

Since internet jobs are often short term project related assignments, employers don't usually hire full time employees to do those jobs. Instead, they hire someone who does freelance work on the internet, pays them a set agreed upon fee, and doesn't have to pay anything else once the job is completed. The great thing about temporary internet jobs like this though, is that you can often have several jobs going at once, and you can choose to work whatever hours you'd like.

One of the best ways to find internet jobs for freelancers and contractors, is to visit one or more of the freelance project websites. Sometimes there is a fee to join these, but you'll find there are many new internet jobs posted almost every day, and you can compete with other job seekers to be the winning contractor.

How to Register a Domain Name


This article demonstrates how to register a domain name. A domain name is the thing that looks like my-domain-name.com. If you intend to create a website, you will need to know how to register a domain name.
Registering a domain name is no different to any other online purchase - you simply add it to your shopping cart, then head to the checkout.

Where Can I Register a Domain Name?

You register your domain name through a domain name registrar (or partner site) like ZappyHost.
To register your domain name, enter your preferred domain into the search form. If it's available, simply proceed to the checkout. ZappyHost will walk you through the registration step by step.

Step by Step

Here's more detail on registering your domain name.
  1. Check Availability (opens in new window) This is where you check that your preferred domain name hasn't already been registered by somebody else. A domain name can only be registered to one person at any one time, so if someone else has already registered it, you won't be able to (or you can put it on back order). Of course, the good thing about this is that, once you register your own domain name, nobody else can get it - it's yours for as long as you want it to be!
    To check availability, go to ZappyHost, enter your preferred domain into the search form, and click "GO!".
  2. If the domain is not available, try again using an alternative name.
  3. If the domain is available, continue to checkout. This part is just like purchasing any other product online. You simply follow the prompts through to the checkout. You may be offered related products, such as similar domain names or different top level domains. To add these to your order, click "YES! Add these to my order.". Otherwise click "Continue to checkout".
    Note that you must supply up to date contact details. Domain name registrars won't let you register a domain name without providing these details. This is a requirement by ICANN (see below for info on ICANN).

Who is the Worldwide Authority for Domain Names?

The Internet Corporation for Assigned Names and Numbers (ICANN) is the organization responsible for top-level domains. Top level domains include .com, .org, .net, and much more.
Although ICANN is responsible for top-level domains, you can't actually go directly through them to register your domain name. You have to go through an accredited domain name registrar or partner site (such as ZappyHost).
ICANN operates the Internet Assigned Numbers Authority (IANA) and is in charge of maintaining the DNS root zone.

About Domain Name Registrars

Domain name registrars are companies accredited by the Internet Corporation for Assigned Names and Numbers (ICANN) and/or by a national ccTLD authority to register Internet domain names. These companies are often web hosting companies who offer a range of website-related services.
Again, ZappyHost is an example of a web hosting company offering domain names.

How to Block a Website

Introduction

There are many reason why you need to know how to block a website. Some of the most common reasons are you have been targeted by spammers who use adware and popups to attack your PC. Other reasons may be to prevent your children from having access to certain site content such as porn and gambling.

Depending on the level of security you wish, learning how to block a website may require a adjustments of your web browser, the use of internet filtering software or editing of your host file. At any rate you can try all methods to see which works best for you.


How to block a Website using Internet Explorer

Internet Explorer version 5 and later offer the ability for heighten security and privacy. You can block a site by following the directions below:
1. Load your Internet explorer
2. Click Tools
3. Click Internet Options
4. Click the Privacy tab
5. Under the Privacy window, Click Sites
6. Type in the site address that you want to Block and Click OK. Remember this technique only blocks on one site at a time. Parental control software will allow you to block multiple sites and categories.


Block a website step 1


block a website step 2


Here are alternate instructions to block a website using Internet Explorer.
Tools ->Internet Options->Security->Restricted sites->Sites->Type in the site address and Click ADD then click OK

How to Restrict a Website using Firefox

Firefox requires an add-on to restrict sites. You can find many good ones at Mozilla.org. The best one is BlockSite.

Here is How:
1. In Firefox, click Tools
2. Click Add-ons
3. Click Get Add-ons
4. Choose Browse All Add-ons.
5. Type blocksite in the search bar.After installing the add-on you will be able to block sites with just a few clicks.

How to block a Website using Google Chrome

1. Open your Chrome Web Browser
2. Click the wrench symbol in he upper right corner.
3. Choose Tools
4. Click Under the Hood tab.
5. Choose Change Proxy Settings.
6. Click Security, click Restricted Sites
7. Double click Sites and add the site you want block


google chrome block


How to Block A Website in All Web Browsers


This action will require you to edit your Host file. Your host file is a computer file used to store information on where to find a node on a computer network. For more a more detailed description. Check out this link Host File Description Link
In Windows XP
1. Click Start->All Programs->Accessories->Command Prompt.
2. Click Command Prompt This will open a DOS command window.
3. Type: notepad C:/Windows/System32/drivers/etc/hosts
4. Locate the line 127.0.0.1 localhost
5. To block the website google.com for example, just add this text under 127.0.0.1 localhost:

127.0.0.1 google.com
127.0.0.1 www.google.com
You can add as many sites any site, However you will need to prefix it with "127.0.0.1".

6. Save the file
Google will now be blocked in all web browser. This is an advanced but easy method on how to blow a website.


block a website step 3


block a website step 4

Wednesday, February 3, 2010

How to Upload to an FTP Server

FTP, or File Transfer Protocol, is a method of storing and retrieving files remotely over a network connection. In any FTP connection, there are two participants: the FTP server, which holds the remote files, and the FTP client, which uploads or downloads the files from the server. Files can be uploaded to an FTP server via one of two methods: using an FTP software program such as FileZilla, or by using a web browser.

Instructions

  1. 1
    If using a software program, connect to the server using its IP address. This should be provided to you by your IT department, or by the owner of the FTP server.
  2. 2
    If using a web browser, connect to the server using either its IP address or its DNS location. FTP sites and servers are designated by the "ftp://" in front of the address, rather than "http://".
  3. 3
    Log in if necessary. Some FTP servers allow anonymous logins, which do not require a username or password.
  4. 4
    Most FTP client software programs use a drag-and-drop interface for ease of use. Simply drag the file to be uploaded from your hard drive to the directory on the server. The file will be transferred.
  5. 5
    If using a web browser interface, use the buttons in the HTML form to browse to the file you wish to upload, and click "Upload." The file will be transferred.

Wednesday, March 25, 2009

how to start a personal blog ?

So you want to start a blog? To some, blogging may seem intimidating, but know that it can be a fun way to express yourself on the internet. Here you will find a couple of easy tips to point you in the right direction of starting your own personal blog.
Difficulty: Easy

Instructions

  1. 1
    First you will want to consider the reasoning behind blogging. Do you have creative ideas? Find something that interests you and appeals to you or other readers. Stick with it. You may instead just want a blog to jot down your own life happenings. This is okay too. Whatever it is, make sure you have a worthy subject to blog about!
  2. 2
    Now it is time to find a free blogging service. This is easy. Just use Google! Sites like Livejournal.com and Blogger.com may work for you, but there are tons to choose from!
  3. 3
    Next you will want to find a witty title for your personal blog. Think of something catchy that will perfectly describe your subject matter.
  4. 4
    Create the look of your blog. You may want to keep it standard, create your own background and look, or use one off of the site. This is entirely up to you.
  5. 5
    Begin writing! Let all of your inspirations come out into your first post. You may want to write what your blog is going to be about here and address the things you'd like to cover in the future. Thoroughly explain your first post and then post it.
  6. 6
    Now you will want to promote your blog. Social networking websites work best when it comes to this. Spread the word to your friends! They will be able to leave you feedback and pass your blog on for others to see. If you wish for your blog to be private then just keep it to yourself. You may also want to check out the privacy features that your blogging website provides.
  7. 7
    Continue to write! There is nothing worse than an abandoned blog. Keep your material fresh and exciting and in general, just have fun with it!