Wednesday, March 2, 2011

How do I get wireless internet?

Wireless internet is not just "out there" for you to connect up to. You need to take steps, whether it's setting something up, paying for something, or at a minimum, asking for permission.
It's definitely not the case that you can just grab a wireless card and suddenly be connected anywhere you want. The wireless capabilities of your computer are only half of what's needed.
There are several approaches to getting a wireless internet connection.
WiFi
WiFi is a medium range wireless networking protocol. By medium range, I mean that its range is typically around 30 to 300 feet, depending on conditions. That means it's something you need to be fairly close to.
The most common WiFi setup is to get a WiFi router or access point, and connect it to your own wired internet connection. For example, you might upgrade and get a DSL connection, and then place a WiFi router on that connection so that you can get the internet wirelessly anywhere in your home.
The second most common WiFi setup is the public WiFi hotspot. This is exactly the same as what I've described you do in the home: the hotspot owner has a wired internet connection to which they've connected a WiFi router or access point, and explicitly left it in the unsecure open mode for anyone to use.
"The most common WiFi setup is to get a WiFi router or access point, and connect it to your own wired internet connection."
The key take-away here for WiFi is that it's not everywhere - you need to either setup a WiFi access point yourself that connects to your wired internet connection, or you need to be close enough to a free hotspot to make use of it. (More on that below.)
WiMax
WiMax is a longer range wireless technology; its range is typically measured in single digit miles. Much like cellular, which I'll discuss in a moment, WiMax uses a network of transmitters (equivalent to WiFi access points, but much more powerful) to give a large geographic area of coverage.
You get WiMax by signing up for WiMax service with a provider. They'll then provide you with the hardware and account necessary to connect up. The WiFi ability of your laptop has nothing to do with this; WiMax is a different technology.
Right now WiMax appears to be struggling, but for business, not technical reasons as I understand it. Coverage is limited and prices, last I checked, are quite high for the average consumer.
Cellular
The cellular phone network is, essentially, a large digital network so it's no surprise really that it can be used for internet connectivity as well. The coverage area is perhaps the largest of all - pretty much anywhere your cellular phone will work. It's not as fast as WiFi or WiMax, but that's improving over time.
Like WiMax you'll typically need to sign up for a data plan with your cellular carrier, and also like WiMax you'll need additional hardware - your WiFi capability has no relationship to cellular. The additional hardware might be as simple as a cable or Bluetooth connection to your existing phone, or it might be an additional cellular network adapter for your computer.
There are also third parties such as Clearwire who use the cellular network to provide wireless internet without involving your cell phone or requiring that you sign up with a cellular provider. For a monthly fee, they provide a small box that looks somewhat like a wireless access point that handles all the magic of connecting up to the cellular network to provide connectivity.
BlueTooth
No, it's not an option, but I have to mention it because many people seem to think it is, since it's "wireless".
Bluetooth is an extremely short-range wireless connectivity technology. By extremely short range, I mean 10-30 feet. Just far enough to connect to, say, your wireless keyboard or mouse. It is not a means to get wireless internet connectivity. When it's used in conjunction with something like your cellular phone, it's the cellular network that's providing your internet. Bluetooth is just providing that last hop between your cell phone and your computer.
"But I can connect without having done any of that."
This is typically the response I get, "proving" I'm wrong, and that there must be WiFi everywhere.
Take the original question: "I can get on the internet from my iPod at the edge of my property".
That's not terribly surprising. The iPod uses WiFi, and chances are there's simply an open WiFi access point close enough to that side of your property so as to be in range.
The point is that it's someone else's WiFi.
Do you have permission to use it?
Someone else is paying for it. They're presumably paying for a wired connection and have purchased the hardware to set up the WiFi access point. Just because you can connect doesn't mean that it's appropriate for you to do so. (In some cases it might even be illegal.)
Even if it's an open WiFi hotspot - perhaps a coffee house - it's their connection and they set the terms. Typically their terms are such that the WiFi is provided for their customers, not just "anyone in range".
If it's a neighbor ... well, they should have set up encryption to prevent just this scenario, but even if they didn't that doesn't mean it's appropriate for you just to connect.
Ask first.
If they give you permission, then your solution might be to try a WiFi repeater or range extender in your home, or getting a larger antenna on your wireless device. I'll caution that this isn't always simple. Wireless networking seems to be partly magic, but it's the direction I'd steer you in once you had permission to do so.
But remember, if you're using someone else's internet connection they can monitor your traffic.
In the long run, my actual recommendation is to upgrade to DSL and get a WiFi router of your own.
Be sure to password protect that WiFi connection so that someone doesn't steal your internet connection because they just happen to be close enough.

How to Add an Internet Calendar to Outlook 2007

To deploy Internet Calendar subscriptions by using Group Policy
  1. In Group Policy, load the Office Outlook 2007 template (Outlk12.adm).
  2. Under User Configuration\Administrative Templates\Microsoft Office Outlook 2007\Tools | Accounts\Internet Calendar Subscriptions, double-click Default Internet Calendar subscriptions.
  3. Click Enabled.
  4. Click Show.
  5. In the Show Contents dialog box, click Add to add a Value Name and Value pair for each subscription.
  6. In the Add Item dialog box, enter the Value Name and the Value in the text boxes. The Value Name is for your reference only.
    The Value is the URL of the WebCal subscription, specified as: webcal://url of subscription.
  7. Click OK to add the subscription to the list.
  8. Click Add if you want to enter another subscription.
  9. When you finish entering subscriptions, click OK to exit the Show Contents dialog box.
  10. Click OK.
To configure Internet Calendar options by using Group Policy
  1. In Group Policy, load the Office Outlook 2007 template (Outlk12.adm) and go to User Configuration\Administrative Templates\Microsoft Office Outlook 2007\Tools | Accounts\Internet Calendar Subscriptions.
  2. Double-click the option that you want to configure. For example, to disallow roaming for subscriptions, double-click Disable roaming of Internet Calendar subscriptions
  3. Click Enabled.
  4. Click OK.

How to Create an Adobe Acrobat File

If the original is in Microsoft Word format. . .
1. Open the original document in Microsoft Word.
2. Make any final changes to the document and save.
3. Under File, select Print.
4. Change the Printer Name to Acrobat PDF Writer.
5. By default, the name of the new pdf file will be the same as the Word file and it will be
saved in the same directory. If this is OK, then click on OK. Otherwise, rename the file
and/or change the directory where the file is save before clicking on OK.
The Adobe Acrobat file has been created. To view, double click on the file.
To place the file on the Web. . .
1. Save to t:\webpages\
2. Send email to web@manta.colostate.edu letting us know what you would like to do
with the file – where it should go, if it needs to be linked from any Web page. . .
If the document contains specific URLs that need to be “clickable,” there are some additional
steps to complete before placing the file on the Web.
1. Open Adobe Acrobat (the program, not the Reader). It is located under
Start/Programs/AdobeAcrobat.
2. Under File, Open, find your Adobe Acrobat file wherever you saved it.
3. Under Tools, select Web Links and then Create.
4. By default, all URLs will be made into Web links. If this is OK, click on OK.
Otherwise, select the pages that require links before clicking on OK.
5. Re-save the page.
In addition to Microsoft Word, Adobe Acrobat files can be made from Microsoft Excel
spreadsheets, PowerPoint, Access reports, WordPerfect or other text documents. The steps are
basically the same. For more in-depth instruction, consider taking the CTSS workshop on Adobe
Acrobat.

How to Remove Embedded Fonts From PDF

Here is the steps on how to remove the emvedded fonts from PDF for Roman text and East Asian text.

Step 1. Open the PDF file in Adobe Acrobat first, click "Advanced" -> "PDF Optimizer"

Step 2. Click "Fonts" which in the left pane.

Step 3. Select the font you want to remove from the "Embedded fonts" pane. You can select multiple fonts by pressing down the "Ctrl" key as you select multiple fonts.

Step 4. Click "Unembed" and then click "OK"

Step 5. Provide a name for the file, select where you want to save the file and click "Save."

You have now removed the embedded fonts from PDF.

How To Change font size of web page text in Internet Explorer and Firefox web browsers

The quickest way to change font size in both Internet Explorer and Firefox- if you have a mouse with a scroll wheel (who doesn't?)

An IBM mouse with a scroll wheel that can be used to change the font sizes of web page text 
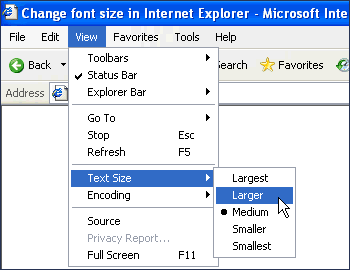
Changing font sizes in both Internet Explorer and Firefox using the scroll wheel on the mouse is definitely quick and easy, especially when you don't want or don't like to tinker around with browser menu options or keyboard shortcuts.
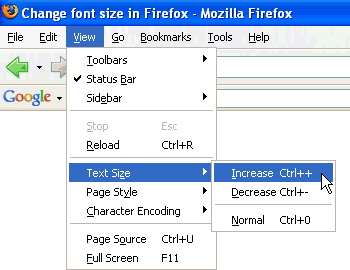
Hit the Control key and keep it pressed. Now, move the scroll wheel and see what happens - scrolling the wheel away from your hand will decrease the font size while if you scroll it towards your hand, the font size will increase.
A few points to remember. Internet Explorer will let you resize the fonts to 5 sizes - Largest, Larger, Medium (the default), Smaller and Smallest. Firefox, however, has a wider range and lets you decrease the font size till it becomes illegible or enlarges it so much that you see only one word on the screen (I've done this).
By the way, Internet Explorer 6.xx (under Windows) has an issue with web sites on which the font sizes have been set with the px unit of measurement. The browser does not let you change the font sizes on such web sites. I don't think this is a bug because the very idea of putting text in px units is not to let visitors change the font sizes.

What if you don't have a mouse with a scroll wheel? Use the browser menu or learn the keyboard shortcuts

Another way to change font sizes of text on web pages in Internet Explorer and Firefox is through the View menu.

Internet Explorer

Click on View from the top menu and move down to Text Size. You can now change the text to one of the five sizes - Largest, Larger, Medium, Smaller and Smallest. (Refer image below). Internet Explorer lets you change the font size to only one of these five values.
Change the font size of web page text in Internet Explorer using the View menu
You can also accomplish the same using keyboard shortcuts. ALT-V would bring up the View menu. Clicking on the "x" key would open the Text Size menu. You can now use the up and down arrow keys and finally click on "Enter" once you have made your selection.

Firefox

From the View menu, choose Text Size and then select whether you want to increase or decrease the font size. (Refer image below)
Change the font size in Firefox using the View menu
The keyboard shortcuts for changing the font size of text on web pages in Firefox are much simpler than Internet Explorer. Keeping the CONTROL key pressed, click on the "+" key to increase the font size and "-" key to decrease the font size. I know I couldn't resist the temptation myself, but don't play around much with this feature else you can get a splitting headache. Since Firefox allows you to change text sizes across a wider range than Internet Explorer, I suggest you use the keyboard shortcuts on this browser.

How to change my language

1. Change your language settings

Tired of pop-ups telling you the word "colour" is spelled incorrectly? Many computers are preset for United States language settings. You can modify your Windows settings to reflect the area of the world you live in. Follow these steps to change your language settings using Windows XP:
Go to the Start menu and select Control Panel.
Double-click Regional and Language Options.
Click the Regional Options tab and within Standards and formats, select the language that you wish.
Click Apply and then click OK.

2. Personalize a screen saver

Does your computer screen turn black when you step away from your desk for too long? Why not display your favorite family photo or a picture from your latest vacation instead? Follow these steps to change your screen saver to one of your digital photos using Windows XP:
Store the photos that you want to display in your My Pictures folder.
Go to the Start menu and select Control Panel.
Double-click Display and select the Screen Saver tab.
Scroll through the list of screen savers and select My Pictures Slideshow. Click Apply and then click OK. This option will automatically use any photos that you have stored in the My Pictures folder to produce your new, personalized screen saver.
For more options, click Settings before you click Apply and then OK.

3. Choose your sounds and volume

Customizing the sounds on your computer can help alert you to important things, such as calendar appointments, incoming mail, and instant messages. If you love music, set your volume and speaker settings to the perfect listening volume. Select from the tips below to control your computer's sound.
Enhance the sound of your speakers:
Load Microsoft Plus! onto your computer.
Open Windows Media Player.
Go to the Tools menu, select Plus! Speaker Enhancement, and then click Enable.
You may be prompted to configure your speakers if they have not been already.
Follow the instructions and you will be ready to listen to your favorite tunes.
Control the volume levels on your computer:
Go to the Start menu and select Programs, then Accessories, then Entertainment, and then Volume Control.
Adjust the volume balance between speakers for different listening functions.
Select Mute all to completely turn off the sound.
Then, put the volume control icon on the taskbar for easy future access.

4. Customize the speed of your mouse

How fast do you move between programs and documents? Everyone's clicking habits and speeds are different. Follow these steps to change your mouse speed using Windows XP:
Go to the Start menu and select Control Panel. Double-click Mouse.
Click the Buttons tab. Under Double Click Speed, use your mouse to slide the arrow to the desired setting.
Double-click the folder shown to confirm the setting before you click OK.

5. Change your desktop appearance

Did you know that you can change the color and size of the text, window pane, titles, border, and even the whole screen? The desktop appearance tab is the best spot to change the look and feel of your computer in one easy step. Choose from pre-set color and size combinations, such as Rainy Day and Desert. Follow these steps to change your desktop appearance using Windows XP:
Right-click on your desktop and select Properties.
Select the Appearance tab.
Make sure that Windows and buttons is showing Classic Style for a larger variety of styles.
Select from the Color scheme drop-down menu. As you select different color combinations, you can preview them in the box above. Once you have selected a setting you like, click OK.

6. Customize your taskbar layout

Are there ten icons along the bottom taskbar of your computer screen and you only know what four of them are? Keep your favorite programs in a convenient location and hide the ones that you use infrequently. Follow these steps to customize your taskbar using Windows XP:
Right-click a blank spot on the taskbar and choose Properties from the menu.
Select Lock the taskbar to prevent it from being moved to a new location or resized.
Select Auto-hide the taskbar if you wish to hide it when not in use.
Select Group similar taskbar buttons to have similar items grouped in one button when the taskbar is crowded.
Click Hide inactive icons to conceal icons that you have not recently used.
Click Apply and then OK to save your changes.

7. Set your default Web page

Do you spend most of your day online at a certain Web site? Set your Web browser to open to your favorite online spot by making it your default page. Follow these steps to set your Web browser default page using Windows XP:
Log on to the Web site you visit every day.
In Internet Explorer, click the Tools menu and select Internet Options. Under the Home Page section, click Use Current.

8. Choose your Windows Views

When searching through your files, such as those in your My Documents folder, you can view them in five different ways: Thumbnails View, Tiles View, Icons View, List View, and Details View. Follow these steps to change the view of your lists using Windows XP:
Choose the view that you want from the View menu or click the Views button on the Standard Buttons toolbar.
Use the View menu to change the way that items are arranged.
Experiment to see which view is best suited to your work and to the contents of the folder.

9. Customize your browser size

Do you like a new window to open over the entire screen or slightly smaller? Set your windows to the exact size you want them to be when you open a new page. Follow these steps to change the size of your browser windows using Windows XP:
Close all your browser windows but one.
Use your mouse to drag the sides of the window to the shape you want it to appear.
Go to the File menu and click Close.
Re-open your browser; it will open to the correct size.
Click the maximize button in the upper-right corner to take the window to full size.

10. Give each family member a login

Now that you have chosen all of your preferences and personalized your PC, invite the whole family to do so by creating an individual login for each person. Follow the steps below to create an individual profile for each family member and encourage everyone to organize according to their personal preferences.
Log on as the computer administrator to add a new user.
From the Start menu, go to Control Panel and select User Accounts.
Under Pick a task, click Create a new account.
Type a name for the new user account and click Next.
Click either Computer administrator or Limited, depending on the type of account you want to assign to the new user.
Click Create Account.

How to Find Your Computer IP Address (Windows)

  1. Click the Start menu button on the Windows taskbar.
  2. Click 'Run...' on this menu.
  3. Type 'cmd' in the text box that appears. A command prompt window launches on the desktop.
  4. In this command window, type 'ipconfig /all'. Details are shown for each of the computer's network adapters. Computers installed with VPN software or emulation software will possess one or more virtual adapters.
  5. The 'IP Address' field states the current IP address for that network adapter.
  6. The 'Physical Address' field states the MAC address for that adapter.

How to install windows XP

Installation process

Installing Windows XP can take up to two hours. To make the process more manageable, it has been broken up into several sections. When you are ready, install Windows XP:
Part 1: Begin the installation
Part 2: Continue the installation
Part 3: Complete the installation
Part 1: Begin the installation
1.Insert the Windows XP CD into your computer and restart your computer.
2.If prompted to start from the CD, press SPACEBAR. If you miss the prompt (it only appears for a few seconds), restart your computer to try again.
Command window with prompt "Press any key to boot from CD"
3.Windows XP Setup begins. During this portion of setup, your mouse will not work, so you must use the keyboard. On the Welcome to Setup page, press ENTER.
Windows XP Professional Setup page
4.On the Windows XP Licensing Agreement page, read the licensing agreement. Press the PAGE DOWN key to scroll to the bottom of the agreement. Then press F8.
Windows XP Licensing Agreement page
5.This page enables you to select the hard disk drive on which Windows XP will be installed. Once you complete this step, all data on your hard disk drive will be removed and cannot be recovered. It is extremely important that you have a recent backup copy of your files before continuing. When you have a backup copy, press D, and then press L when prompted. This deletes your existing data.
6.Press ENTER to select Unpartitioned space, which appears by default.
Windows XP Professional Setup, partitioned and unpartitioned space page
7.Press ENTER again to select Format the partition using the NTFS file system, which appears by default.
Windows XP Professional Setup page with Format the partition using the NTFS file system selected
8.Windows XP erases your hard disk drive using a process called formatting and then copies the setup files. You can leave your computer and return in 20 to 30 minutes.
Windows XP Professional Setup Please wait while Setup formats the partition page

Part 2: Continue the installation
9.Windows XP restarts and then continues with the installation process. From this point forward, you can use your mouse. Eventually, the Regional and Language Options page appears. Click Next to accept the default settings. If you are multilingual or prefer a language other than English, you can change language settings after setup is complete.
Regional and Language Options page
10.On the Personalize Your Software page, type your name and your organization name. Some programs use this information to automatically fill in your name when required. Then, click Next.
Personalize Your Software page
11.On the Your Product Key page, type your product key as it appears on your Windows XP CD case. The product key is unique for every Windows XP installation. Then, click Next.
Your Product Key page
12.On the Computer Name and Administrator Password page, in the Computer name box, type a name that uniquely identifies your computer in your house, such as FAMILYROOM or TOMS. You cannot use spaces or punctuation. If you connect your computer to a network, you will use this computer name to find shared files and printers. Type a strong password that you can remember in the Administrator password box, and then retype it in the Confirm password box. Write the password down and store it in a secure place. Click Next.
Computer Name and Administrator Password page
13.On the Date and Time Settings page, set your computer’s clock. Then, click the Time Zone down arrow, and select your time zone. Click Next.
Date and Time Settings page
14.Windows XP will spend about a minute configuring your computer. On the Networking Settings page, click Next.
Networking Settings page
15.On the Workgroup or Computer Domain page, click Next.
Workgroup or Computer Domain page

Part 3: Complete the installation
16.Windows XP will spend 20 or 30 minutes configuring your computer and will automatically restart when finished. When the Display Settings dialog appears, click OK.
Display Settings dialog box
17.When the Monitor Settings dialog box appears, click OK.
Monitor Settings dialog box
18.The final stage of setup begins. On the Welcome to Microsoft Windows page, click Next.
Welcome to Microsoft Windows page
19.On the Help protect your PC page, click Help protect my PC by turning on Automatic Updates now. Then, click Next.
Help protect your PC page
20.Windows XP will then check if you are connected to the Internet:
If you are connected to the Internet, select the choice that describes your network connection on the Will this computer connect to the Internet directly, or through a network? page. If you’re not sure, accept the default selection, and click Next.
Will this computer connect to the Internet directly, or through a network? page
If you use dial-up Internet access, or if Windows XP cannot connect to the Internet, you can connect to the Internet after setup is complete. On the How will this computer connect to the Internet? page, click Skip.
How will this computer connect to the Internet? page
21.Windows XP Setup displays the Ready to activate Windows? page. If you are connected to the Internet, click Yes, and then click Next. If you are not yet connected to the Internet, click No, click Next, and then skip to step 24. After setup is complete, Windows XP will automatically remind you to activate and register your copy of Windows XP.
Ready to activate Windows? page
22.On the Ready to register with Microsoft? page, click Yes, and then click Next.
Ready to register with Microsoft? page
23.On the Collecting Registration Information page, complete the form. Then, click Next.
Collecting Registration Information page
24.On the Who will use this computer? page, type the name of each person who will use the computer. You can use first names only, nicknames, or full names. Then click Next. To add users after setup is complete or to specify a password to keep your account private, read Create and customize user accounts.
Who will use this computer? page
25.On the Thank you! page, click Finish.
Thank you! page
Congratulations! Windows XP setup is complete. You can log on by clicking your name on the logon screen. If you’ve installed Windows XP on a new computer or new hard disk drive, you can now use the File and Settings Transfer Wizard to copy your important data to your computer or hard disk drive.
After logon, take a few minutes to validate your copy of Windows. Validation gives you access to hundreds of free downloads from the Microsoft Download Center. To learn about the new features Windows XP provides, click the Start button, click All Programs, click Accessories, and then click Tour Windows XP.

How to Set up Parent Controls in Windows 7

Set up Parental Controls

If your computer is connected to a domain, Parental Controls aren't available.
You can use Parental Controls to help manage how your children use the computer. For example, you can set limits on the hours that your children can use the computer, the games they can play, and the programs they can run.
To watch a video, see Picture of a Play buttonVideo: Using Parental Controls.
When Parental Controls blocks access to a game or program, a notification is displayed that the program has been blocked. Your child can click a link in the notification to request permission for access to that game or program. You can allow access by entering your account information.
To set up Parental Controls for your child, you'll need your own administrator user account. Before you get started, make sure each child that you want to set up Parental Controls for has a standard user account. Parental Controls can be applied only to standard user accounts. For more information about user accounts and setting them up, see What is a user account?
In addition to the controls that Windows provides, you can install additional controls, such as web filtering and activity reporting, from a separate service provider. For more information, see How can I add additional parental controls?

To turn on Parental Controls for a standard user account

  1. Open Parental Controls by clicking the Start button Picture of the Start button, clicking Control Panel, and then, under User Accounts and Family Safety, clicking Set up parental controls for any user.‌ ‌ Administrator permission required If you're prompted for an administrator password or confirmation, type the password or provide confirmation.
  2. Click the standard user account that you want to set Parental Controls for. If the standard user account isn't set up yet, click Create a new user account to set up a new account.
  3. Under Parental Controls, click On, enforce current settings.
  4. Once you've turned on Parental Controls for your child's standard user account, you can adjust the following individual settings that you want to control:
    • Time limits. You can set time limits to control when children are allowed to log on to the computer. Time limits prevent children from logging on during the specified hours. You can set different logon hours for every day of the week. If they're logged on when their allotted time ends, they'll be automatically logged off. For more information, see Control when children can use the computer.
    • Games. You can control access to games, choose an age-rating level, choose the types of content you want to block, and decide whether you want to allow or block unrated or specific games. For more information, see Choose which games children can play.
    • Allow or block specific programs. You can prevent children from running programs that you don't want them to run. For more information, see Prevent children from using specific programs.

How to Disable Windows 7 Auto Update Restart


Windows 7 automatic updates is an important feature to keep your computer updated and secure by installing security patches & the latest bug fixes. While it keeps your computer away from any common threats, the process can be somehow annoying especially when it persistently nags for a computer restart/reboot. You can delay the process up to 4 hours but there isn't an option to disable it. Fortunately it can be easily disabled through Local Group Policy Editor.
1. Click the Start menu and type in "gpedit.msc" in the search box and press enter. The Local Group Policy Editor will popup.
2. On the left pane, expand to "Computer Configuration > Administrative Templates > Windows Components" and select Windows Update.

3. Double click on "No auto-restart with logged on users for scheduled automatic updates installations" option.Change the option from "Not Configured" to "Enabled". Click OK & close Local Group Policy Editor. So no more Windows restart after automatically installing updates.

How To delete internet cookies

Follow these steps to delete the cookies stored on your computer. After you delete cookies, websites will no longer remember information you have entered on previous visits (for example, they will no longer have record of your user name or preferences).

Delete cookies in Internet Explorer 7

  1. Open Internet Options by clicking the Start button Picture of the Start button, clicking Control Panel, clicking Network and Internet, and then clicking Internet Options.
  2. Click the General tab, and then, under Browsing history, click Delete.
  3. Under Cookies, click Delete cookies, and then click Yes to confirm that you want to delete them.
  4. Click Close, and then click OK.

Delete cookies in Internet Explorer 8

  1. Open Internet Explorer by clicking the Start button Picture of the Start button, and then clicking Internet Explorer.
  2. Click the Safety button, and then click Delete Browsing History.
  3. Select the check box next to Cookies.
  4. Select the Preserve Favorites website data check box if you do not want to delete the cookies associated with websites in your Favorites list.
  5. Click Delete.

How to Start Learning Objective-C on Windows


This tutorial is about installing Objective-C and writing a simple Hello World application on a Windows based machine. I’ve tested the following procedure on a Windows 7 machine.

Prerequisites:
- Unix like shell (a text based environment like a super Command Prompt );
- Objective-C compiler;
- “Real” text editor (God forbid to use Word, WordPad or Notepad).

For the first two points we will install GNUstep which is “a free and open version of the Cocoa (formerly known as NeXTSTEP/OpenStep) APIs and tools”, see http://www.gnustep.org/.
The Windows version of GNUstep is located at http://www.gnustep.org/experience/Windows.html
from the Download section you should save on your machine at least GNUstep MSYS System, GNUstep core and GNUstep Devel.


Install the above three packages in the order you’ve downloaded them.

For a simple text editor we will use Notepad++, which can be downloaded from:
chose “Download the current version” and select the first package (the installer). Install Notepad++ on your computer.

Start the GNUstep shell from Start->All Programs->GNUstep->Shell, at a later time you may want to create a link in the Taskbar for launching this faster. You should be presented with a console window in which you can write Unix commands:

Now, let’s code a simple Objective-C program, don’t worry if you see something that you do not understand in the code, this is only to test if the installation has succeeded and to show you how to compile and run a simple program.

Open Notepad++ and paste (or write if you feel inclined to do so) the following example:


#import <Foundation/Foundation.h>
int main (int argc, const char * argv[]) {
NSLog (@"Hello World!");
return 0;
}


This file must be saved in the home folder from GUNstep install, on my computer this is located at “C:\GNUstep\home\Paul”. Save the file with the name ending in .m, for e.g. name it hello.m.

Next step – compiling the Objective-C source code, write this command in the GNUstep shell:
gcc `gnustep-config --objc-flags` -L /GNUstep/System/Library/Libraries hello.m -lgnustep-base –lobjc
you should see something like :

If everything was OK you should end up with a file a.exe (the executable) in your home folder from GNUstep. The code can be run by writing in the shell window ./a, you should see:

Now, you should be able to learn Objective-C on your Windows based machine. For running the same code on a Mac machine you could find plenty of good tutorials on Internet.

How to Calculate Greenhouse Heating

How do I calculate energy requirements to decide what size heater I need for my greenhouse?

First of all, brace yourself. Heating a greenhouse will likely be expensive. However, there is nothing like a tomato freshly picked from one's own greenhouse in midwinter. Follow the steps below to calculate your energy requirements. Only you can decide what price you are willing to pay for that tomato or to see those orchid blossoms.
These calculations assume that you have first done everything you can to seal any cracks and secure any openings in your greenhouse.
It couldn't hurt to have a few barrels of water or a big pile of rocks in the greenhouse and to have your plants in larger pots as large masses hold their heat longer. There are many ways to save energy costs. You may have a light on in there part of the time. You may be using heating cables or mats. None of this is factored in. I am also not addressing what type of heating to use. This first attempt is only about the basic calculation. On to simple math...


H=height to eaves
L=length
W=width
R=height to ridge
S=length of roof slope

The basic calculation is based on a single layer glass greenhouse with glazing to ground level. This is a rough calculation, but certainly close enough for your needs.
If you have lower walls that are solid (such as brick), measure them separately and use 1/2 the result in your calculations (because heat loss is less).
If your greenhouse is double-glazed (glass or polycarbonate), the heat requirement figure is about 30% less. (Other materials will differ slightly. I will try to help you with that another time. Meanwhile, this should be good enough for a rough guess.)

My husband says that you should picture placing a heater outside and turning it on. That is what it is like to attempt to heat a greenhouse.

(I don't think it's that bad!)

Calculating your energy requirements for greenhouse heating:

1. Figure out the total inside surface area measurement of your greenhouse:

Surface area of walls and roof slope = 2 x (H + S) x L
Surface area of end walls = (R + H) x W
Add these together for "total inside surface area" (S. A.)
[2 x (H + S) x L] + [(R+H) x W] = S. A.

Using the example of my greenhouse above,
Surface area of walls and roof slope = 2 x (5 + 6.5) x 12 = 276 sq ft
Surface area of end walls = (10 + 5) x 8 = 120 sq ft
276 + 120 = 396 square feet of surface area (We'll round it to 400 sq ft)

2. Calculate the "temperature difference." By this I mean the difference between the desired minimum greenhouse temperature and the average lowest winter temperature in your area.

Let's say that I want to grow tomatoes.
The ideal minimum greenhouse temperature for tomatoes in winter is 60 degrees Fahrenheit.
My average coldest temperature in winter is 33.5 degrees Fahrenheit. (I know this because the National Weather Service has kindly put up on the web the average temperature data for the past 50+ years for my area. See next paragraph for link.)
The difference between the two temperatures in my example is 26.5 degrees F. (T. D.)
Try to be as accurate as possible with your "average coldest winter temperature." For those in the USA, there are some great sites on the web. The National Weather Service now has online Regional Centers web sites full of just the information you as a gardener need! (For those of you elsewhere, I'll keep looking, and put in links as I find them.)

3.
Multiply the "total inside surface area" by the "temperature difference."
(S. A.) x (T. D.) = BTU'S (British Thermal Units) required for heating the greenhouse to please the tomatoes.
To continue the example:
400 x 26.5 = 10,600 BTU's required for Sherry's Greenhouse.
But wait! Sherry's Greenhouse is glazed with twin-wall polycarbonate which should reduce the heating requirement by 30%. To further continue the example:
10,600 x 0.7 = 7,420 BTU's required to heat Sherry's Greenhouse in winter to please those tomatoes. That's better.

4. How about kilowatt hours?

Just divide the BTU figure by 3.413
7,420 / 3.413 = 2174 (That's 2.1 kWh)
In other words, if your 1500 watt (or 1.5 kW) heater needs to run 6 hours, energy consumption is (6 x 1.5 )
or 9 kilowatt hours. Check your monthly statement to see what you are being charged per kilowatt hour. So, if you are being charged $0.06 per kilowatt hour, cost for running the example heater would be $0.5