Saturday, February 19, 2011

how-to-design-a-great-about-us-page


Whether you’re starting from scratch or revisiting an About Us page in need of a little TLC, you can take yours from forgettable to memorable by incorporating these tips.
It’s one of the most important elements on a company’s website and also one of the most undervalued: the ubiquitous “About Us” page—that section on your site that has been collecting virtual dust because you haven’t bothered to read it since, well, you first wrote it.
You may not be paying it much attention, but visitors to your site are. And considering that your About Us page is where the world clicks to learn about your company and the services you offer, which can mean the potential loss or gain of a customer, it deserves a little more consideration and a lot more respect.
“Most of our clients don’t realize how much their About Us page is visited,” saysThomas Harpointner, CEO of AIS Media, an award-winning marketing and interactive media agency in Atlanta. “It’s among the first three pages consumers go to when they visit a site. We’ve worked with both small businesses and Fortune 500 companies, and we spend more time consulting clients on the About Us page than any other. Companies are so focused on the design of their site, their products, and how they’re going to market them that they simply overlook it. It’s an afterthought.”
How to Design a Great “About Us” Page: Make the Human Connection
The primary purpose of your site’s About Us page is to provide information about your business and what it can deliver, so it should include the basics, such as who your company serves, how long it’s been around, and its long-term goals and mission. Don’t forget to include your address. And if your company has multiple locations or does business globally, this is the perfect place to mention that information, or at least link to a page on your site that does, such as your Contact Us page. But don’t stop there, which is a mistake a lot of businesses make. What results is a stale, unoriginal, and downright boring About page.
Fortunately, spicing it up is easier than you think. By incorporating a few strategic components, you can go beyond the yawn-inducing jargon. Simple tactics can make your About Us page a more exciting read and your company seem more accessible, says Lorrie Thomas, aka The Marketing Therapist, a marketing strategist, educator, writer, web marketing expert and speaker, and that can ultimately drive business and increase sales. Avoid writing a soliloquy (too much text is a turnoff) and focus on connecting with your site visitors.
For example, Thomas, who just returned from a 10-day speaking tour on better Web marketing, told her dozen or so employees to write their own bios for her company’s About Us page. Her only mandate was that in addition to providing a snapshot of their professional history, they include personal information, such as hobbies or their favorite activities. Some even set up links to their blogs and personal websites. This might also be a good place to include e-mail addresses for your staff. Readily available contact information shows customers that you want to hear from them and that you have nothing to hide.
“The About Us page needs to reflect the organization,” says Thomas, CEO of Santa Barbara, California-based Web Marketing Therapy. “It’s the story of how a company started, but it should also be the story of who’s behind it. Is the CEO an avid skier? Or a yoga guru? We’re no longer in the world of B to B, or business to business; we’re in a world of what I call P to P, people to people. Relationships are the name of the game. Your clients want to know you, like you, and trust you.”

How I get the about us page in blog dashboard

1. Sign into Blogger Draft (draft.blogger.com)

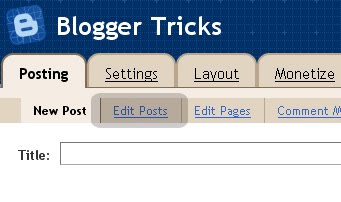
2. Click on New Post as usual.

click on new post in blogger draft

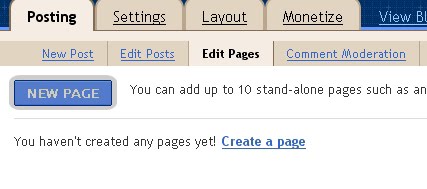
3. Select the Edit Pages from the top menu

select edit pages option from the nav links

4. Click on 'New Page' button.

create new page

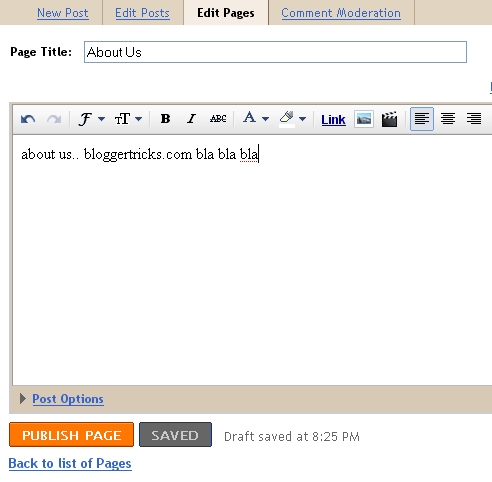
5. Now, give your page a title and write the content and publish the page.

write the content and publish the page

6. If you want to display the Pages list in your Blog sidebar, select the 'Blog Sidebar' option,or you can keep it as nav menu below header by selecting 'Blog Tabs' option.

How to Get Rid of a Computer Virus


  • 1 Visit your virus-scan software manufacturer's Web site and install any virus updates that are available. Then run the software. The software may not be able to delete the virus, but it may be able to identify it.

  • 2 Search the Web for information regarding your specific virus by typing the name of the virus or its associated file into a search engine followed by the word "virus." For example, "Melissa virus," "BubbleBoy virus," etc.

  • 3 Download and install any patches or other programs that will help you eliminate the virus. Or follow any instructions you find on deleting the virus manually.

  • 4 Run another virus scan to make sure the virus has been dealt with properly.


  • Tips & Warnings

    • If you think your computer was affected with an e-mail virus that mails itself to people in your e-mail address book, contact those people and tell them not to open the messages or attachments.
    • Web based email usually has built in virus scanning so viruses never reach your machine.
    • Generally, deleting the file that caused the virus isn't sufficient to eliminate the problem, since many viruses can create new files or corrupt existing files. Your best bet is to use anti-virus software or specific online instructions.
    • Avoid sending out any e-mails until you have properly eliminated the virus. Many viruses can attach themselves to outgoing messages without your knowledge, causing you to unwittingly infect the computers of your friends and colleagues.

    How to get to a MS-DOS prompt or Windows command line.


    Windows Vista and 7 users
    1. Click Start.
    2. Type cmd and press enter.
    If you're attempting to get into a MS-DOS prompt to troubleshoot the computer boot the computer into Safe Mode.
    Windows NT, 2000, and XP users
    1. Click Start.
    2. Click Run.
    3. Type cmd or command and press enter.
    If you're attempting to get into a MS-DOS prompt to troubleshoot the computer, boot the computer into Safe Mode.
    Windows 2000 and XP users who are unable to boot the computer into Normal Windows mode or Safe mode, can also enter the recovery console to manage their computer from a prompt. Additional information about how to do this can be found on document CH000627.
    Finally, if you are experiencing issues getting into Windows NT, 2000, or XP, it may be necessary to run troubleshooting steps from a MS-DOS prompt. It is recommended that the Network Administrator get into the MS-DOS prompt by using either a standard MS-DOS boot diskette (note: will not be able to access data using a standard MS-DOS bootable diskette) or the ERD diskettescreated after the installation of Windows NT, or boot from the Windows XP CD.
    Windows 95, 98, and ME users
    If you are able to get into Windows 95, 98 or ME, you can get to a MS-DOS prompt by following the steps below.
    1. Click Start
    2. Click Run
    3. Type "command" and press enter.
    This will open a MS-DOS shell. However, if you are attempting to troubleshoot an issue with the computer and are using Microsoft Windows 95 or Windows 98, we suggest you restart the computer into MS-DOS. To do this follow the below steps.
    1. Click Start
    2. Click Shutdown
    3. Choose the option to restart the computer into a MS-DOS prompt.
    If you are unable to get into Windows 95 or Windows 98 to get into a MS-DOS prompt, follow the below instructions (Windows ME does not have this option).
    1. Reboot the computer
    2. As the computer is booting, press the F8 key when you hear a beep or when you see "Starting Windows 95" or "Starting Windows 98." Windows 98 users sometimes may find it easier to press and hold the left CTRL key as the computer is booting.
    3. If done properly the user should get to a screen similar to the below screen.
    Microsoft Windows 95 Startup Menu
    =============================
    1. Normal
    2. Logged (\BOOTLOG.TXT)
    3. Safe mode
    4. Step-by-step confirmation
    5. Command prompt only
    6. Safe mode command prompt only
    Enter a choice: 1
    F5=Safe Mode Shift+F5=Command prompt Shift+F8= Step-by-step confirmation [N]
       4.   Select the option for Safe mode command prompt only.
    MS-DOS users
    If you are running MS-DOS with no other operating systems, the computer should be booting into a MS-DOS prompt automatically unless you have a shell or other program loading automatically.
    If the computer is not getting you to a MS-DOS prompt, reboot the computer and as the computer is booting, press the F5 key when you see the message "Starting MS-DOS" or the MS-DOS version. This will load the default standard MS-DOS.
    If you successfully get to a MS-DOS prompt and would like to prevent the computer from loading the program that is preventing you from getting to a MS-DOS prompt, or if you would like to fix possible error messages you may be receiving when booting the computer, edit the autoexec.bat or the config.sys files.
    Windows 3.x users
    If you are running Windows 3.x it is likely that the computer is booting into Windows automatically and bypassing the MS-DOS prompt. If Windows loads successfully into Windows, to exit to a MS-DOS prompt, from Program Manager, click the File menu and then Exit.
    If the computer is trying to load into Windows but is encountering errors while it is booting, reboot the computer and press F5 key when you see the message "Starting MS-DOS" or the MS-DOS version. This will load the default standard MS-DOS.
    If you do not want Windows 3.x to load automatically into Windows 3.x, you will need to edit the autoexec.bat file and remove the "win" line.
    Other operating system users
    If you are using another operating system such as OS/2Linux variants, orUnix variants and you need to get to a MS-DOS prompt, it is recommended that you use a MS-DOS boot diskette unless you are dual booting the computer. Keep in mind that booting from a MS-DOS diskette is not going to allow you to have access to the files used with other operating systems. However, if you're erasing everything and starting over this would allow you to delete all pre-existing information and start over.

    How do I make the Recycle Bin appear on my desktop in Windows Vista or in Windows XP?


    1. On the Tools menu, click Folder Options.
    2. Click the View tab, and then click to clear the Hide protected operating system files (Recommended) check box.
    3. Click Yes when you receive the warning message, and then click OK to close the Folder Options dialog box.
    4. Click Folders on the toolbar.

      Note If Folders is not visible on the toolbar, point to Toolbars on the View menu, and then click Standard Buttons.
    5. In the left navigation pane, under Folders, locate the Recycle Bin folder, and then drag the Recycle Bin folder to the desktop.
    6. On the Tools menu, click Folder Options.
    7. Click the View tab, and then click to select the Hide protected operating system files (Recommended) check box. ClickOK.
    Note This procedure does not re-create the original icon. However, this procedure restores most of the features of the Recycle Bin. This includes the following:
    • Delete a file by dragging it to the Recycle Bin icon on your Desktop.
    • Retrieve a file that you deleted by double-clicking the Recycle Bin icon on your Desktop, right-clicking the file that you want to retrieve, and then clicking Restore.
    • Empty the Recycle Bin by right-clicking the Recycle Bin icon on your Desktop, and then clicking Empty Recycle Bin.
    Note When you use these step to work around this problem, you cannot right-click the Recycle Bin shortcut to access the Recycle Bin Properties. To set properties for the Recycle Bin, follow these steps:
    1. Double-click the Recycle Bin shortcut on the Desktop. The Recycle Bin folder opens.
    2. In the upper-left corner of the Recycle Bin folder, right-click the Recycle Bin icon, and then click Properties.

    how i watch willow tv world cup 2011


    Willow TV is proud to be the Official and Exclusive Licensee of the ICC for the Cricket World Cup 2011 in the USA. The World Cup starts Feb 18th, will be broadcast for the first time in High Definition on our partner platforms DISH Network and DIRECTV.
    To order DISH Network, please visitwww.dishnetwork.com/cricket and for DIRECTV, please visit www.directv.com/cricketticket
    Willow TV offers live video streaming of the event on www.willow.tv with unparalleled features in a single subscription, including
    • Live streaming video at 3 Mbps, 1.2 Mbps and 600 Kbps, on its redundant and highly scalable Content Distribution Network, with distributed encoding locations.
    • Live streaming on all browsers on all Operating Systems
    • Live streaming on Mobile Smartphones including iPhones, Android, Blackberry, Nokia etc
    • Live streaming on IP Connected devices like Samsung Internet@TV ready devices, PS3, Google TV, Roku, Boxee, Netgear Push2TV, with more to be announced shortly
    • On demand replays and highlights
    • Live Video Scorecards for instant catch-up
    Click here for more details about Willow TV's new features.
    Subscribe now to watch the World Cup like never before

    how to maintain good health

    Ways To Maintain Good Health


    10 tips that are easy to follow to maintain good health.

    With all the emphasis put on our health it may seem like a never ending challenge to stay healthy so here are ten simple things to incorporate in your hectic lives:
    1. Eat right

      Eat fruits, veggies, dairy, grains, cereals, proteins and lean cuts of meat. Limit the intake of salty and highly fattening foods. An effective plan is that of the Mediterranean eating habits, where you can acquire on a daily basis the nutrients you need, Omega 3 fatty acids (you know, the good kind), and consume generally delicious food in reasonable portion.
    2. Exercise

      Who has the time, you say? Only 30 minutes, 3 times per week, of moderate intensity cardiovascular workout is all that it takes. You will see not only an improvement in the way you look, but also the way you feel. Physical activity is a great way to release stress.
    3. Floss

      Brushing doesn’t remove every piece of plaque. Lucky us, we have dental floss, which removes food particles in between teeth and at the gum line. Those who don’t floss regularly have much higher chances of developing an oral disease, such as gingivitis. So, grab that string and start flossing!
    4. Reduce Stress

      Take 15 minutes out of your busy day to unwind briefly and take a few deep breaths, inhaling slowly, and then exhaling as you clear your mind. While at work, sit upright, with a straight-back, in your chair. Place both of your arms out to the side and gradually move them upward, meeting directly above your head. Bring them down together in front of you. This should make you feel lighter, calmer, and generally less-stressed for a period in the day.
    5. Smile and laugh

      When you feel that tension building in your neck or you find yourself grinding your teeth, stop and just smile. You’ll instantly feel relieved from your worries. Rent a funny movie or laugh about a ridiculous joke your friend told you. The important thing, just take some time out to laugh and flash that beautiful smile, even if it’s only for yourself.
    6. Drink more water

      Water keeps you hydrated and helps to flush out toxins from your body. Instead of grabbing a soda, pick up a glass, throw in a couple of ice cubes, pour in the water and squeeze in the juice of fresh lemon or throw in a couple sprigs of clean, fresh mint to give it some flavor. (Check the nutrition labels of the trendy flavored-water drinks before buying, many are loaded with sugar and will help to negate the effect of drinking H2O)
    7. Get some sunshine

      We all need vitamin D, which is a nutrient that can be obtained by catching some rays. The sun also assists in releasing endorphins, a secretion from the pituitary gland that is correlated with a generally good, energetic feeling.
    8. Sleep right

      A full eight hours of peaceful sleep is the best idea for your health. If that seems a little much, try taking it easy for about an hour or so before you plan on going to bed. All in all, it is best to try to rest and relax for 1/4-1/3 of the 24 hour day.
    9. Wash your hands

      Wash your hands continuously during the day to kill 90% of germs with hot water and antibacterial soap. If this is even too much to do, just grab some antibacterial hand gel and rub it into your hands, front and back. Diseases are most easily and frequently transferred via the hands.
    10. Maintain healthy relationships

      Healthy, supportive relationships with family and close friends will reduce anxiety and will provide a more positive outlook on life. It’s important to listen as much, if not more than, you talk; think about what you want to say before it comes out of your mouth; understand that everyone is human and makes mistakes.

    How To get international drivers license

    The growing number of road accidents warrants a serious introspection on the part of every road user on the ways of making driving a relatively safe experience. It is upto each one of us to make driving a safe affair.

    Obtaining a valid driving license is the first step towards responsible driving.
    On our part, we give the steps to obtain a Learner's License, and later in the section, a permanent license.

    The way to a Learner's License Forms to be filled :

    A. Form No.1 : Medical Certificate.
    [ You need a Doctor's attestation and a photograph]

    B. Form No. 2 : Application for Learner's License.

    C. Form No. 3 : Application in duplicate.

    Required Documents :

    1. Proof of Age - Xerox copy of Birth Certificate or Passport or School or College certificate along with original for verification.

    2. Proof of Residence - Xerox copy with original for verification of Ration Card or Election I.D. Card or Passport or LIC policy or Electric Bill or Telephone Bill or Property Tax Receipt or if Govt. employee, payslip issued by Govt..

    3. Four passport size photographs, with one to be affixed on Form 1. The Required Fee for each category of vehicle is Rs. 15
    The Test :

    The book on Rules of the Road Regulations is given to the applicant at the time he receives the form. At the time of submission of the form, he will be questioned on traffic rules, signs and signals. If his answers are satisfactory, he will be given the Temporary Driving License, otherwise not.

    Obtaining the Learner's License :

    If the candidate passes the oral test on the Rules of The Road Regulations, he is required to collect his Learner's License from the office of the Regional Transport Officer(RTO).

    The Learner's License allows you to drive the vehicle you have applied for, but only with someone beside you, who is a license holder.

    The sign 'L' should definitely be painted on the back and front of the vehicle in red to alert other road users.

    Period of Learner's License :

    This learner's license is valid for a period of 6 months after which another application would be needed. The permanent license can be obtained after a period of 1 month of having acquired the learner's license, if the applicant so wishes.

    The Finale...

    Way to the Permanent License :

    The required Fees :

    Rs.60 for one category of vehicle.
    Rs.15 for additional categories.
    Rs. 55 for additional endorsement in existing license.

    The candidate must make sure he is well versed in driving by now and is ready for a test drive.

    The following documents are needed at this stage :

    1. Form 4
    2. Original Driver's License
    3. Three Stamp size photographs

    At the time of getting the Permanent License, the applicant must bring along with him/her the category of vehicle for which he has applied for license.

    The next step is a driving test by an expert who is the final arbiter in this respect. A pass here means that the form will be stamped "Test Passed" and directed for Permanent Driving License to the License Issuing Authority. For obtaining the laminated Driving License, the applicant will have to present himself/herself at the concerned RTO's office on the day specified by the AASI for the purpose

    How to Write a New Post in WordPress


    Click to expand the POST menu.
    Click ADD NEW.
    Enter a TITLE for your new post.
    In the provided box, enter your CONTENT.
    You can optionally assign this post to one or more CATEGORIES.
    When you are finished, click PUBLISH.
    Click the VIEW POST link to view your new post.
    The post now shows up on your site.
    Return to the ADMIN area.
    Go to POSTS.
    The new post now shows up in your list.
    You can now EDIT or DELETE the post if you wish, by clicking the corresponding links.
    You now know how to write a new post in WordPress.

    How To create edit box using vc++

    Overview

    An edit box is a control used to either display text, to request text, or to do both. It it provided as a rectangular control with a sunken white background and 3-D borders.
    To add an edit box and click the desired area on a form or a dialog box. To add a new edit box programmatically, declare a variable or a pointer to CEdit using its constructor. To initialize it, call its Create() method. Here is an example:
    BOOL CLabelDlg::OnInitDialog() 
    {
     CDialog::OnInitDialog();
     
     // TODO: Add extra initialization here
     CEdit *Musician = new CEdit;
    
     Musician->Create(WS_CHILD | WS_VISIBLE,
                   CRect(10, 50, 150, 70), this, 0x1552);
     return TRUE;  // return TRUE unless you set the focus to a control
                   // EXCEPTION: OCX Property Pages should return FALSE
    }
    To change the text of the control, a user can click it and start typing. This is possible if allowed it, which is the default behavior. If you don't want the user to be able to change the text of an edit box, at design time, check its Read Only check box or set it to True. To dynamically set an edit box to read-only, add the ES_READONLY style to it.
    The text of an edit box displays its characters at they are set in the alphabet. If you want to hide the characters of an edit box, check its Password check box at design time. In this case, the characters would appear as x. If you prefer a different character, call the SendMessage() function with the EM_SETPASSWORDCHAR as the message. Here is an example:
    BOOL CLabelDlg::OnInitDialog() 
    {
     CDialog::OnInitDialog();
     
     // TODO: Add extra initialization here
     m_AccountPassword.SendMessage(EM_SETPASSWORDCHAR, '&', 0);
    
     return TRUE;  // return TRUE unless you set the focus to a control
                   // EXCEPTION: OCX Property Pages should return FALSE
    }
    Multiline Edit Boxes

    By default, an edit box is used to display a single line of text. An edit box is referred to as multiline when it can display its text on more than one line.
    To create a multiline edit box, use the same Edit control as the above single line Edit box. To make this a multiline edit box, set its Multiline property to True. To do this at run time, add the ES_MULTILINE style to the CEdit. At design time, to make it obvious that the control can display more than one line of text, heighten it:
    Edit Box
    If the user is typing text in an edit control and press Enter, the control, usually a button, that is the default would be activated. This feature is valuable for a single line edit box. If you are creating a multiline edit box, you should allow the user to press Enter while entering text into the control. This would prevent the default button from being activated and would transfer the caret to the next line. To provide this functionality, add the ES_WANTRETURN style or, at design time, set the Want Return property to True.
    If the text of the edit control is longer than the edit control can display at one time, you should equip it with scroll bars. To do this, at design time, set the Horizontal and/or the Vertical Scroll properties to True. At run time, add the WS_HSCROLL and/or the WS_VSCROLL properties.
    Edit Box Methods

    The edit box of Visual C++ does not allow you to set its text at design time but this can easily be done at run time. You can programmatically change the text of an edit box control. If you had Added a Value Control to the edit box and you had set the type to CString, to specify its text, call the CString::Format() method and make sure you update its value with the dialog box by calling UpdateData(FALSE). Here is an example:
    BOOL CLabelDlg::OnInitDialog() 
    {
     CDialog::OnInitDialog();
     
     // TODO: Add extra initialization here
     m_Display.Format("On s'en fout");
    
     UpdateData(FALSE);
     return TRUE;  // return TRUE unless you set the focus to a control
                   // EXCEPTION: OCX Property Pages should return FALSE
    }
    If you had added a Control Variable of type CEdit, Visual C++ would initialize it with an empty string in the constructor. You then use the constructor to initialize the control. Here is an example:
    CLabelDlg::CLabelDlg(CWnd* pParent /*=NULL*/)
     : CDialog(CLabelDlg::IDD, pParent)
    {
     //{{AFX_DATA_INIT(CLabelDlg)
     m_Display = _T("Kassav' - Nou La");
     //}}AFX_DATA_INIT
    }
    At any time, you can call the CWnd::SetWindowText() method to change the text of the edit box. If you did not add the control variable, you can get its pointer using CWnd::GetDlgItem(). Here is an example:
    BOOL CLabelDlg::OnInitDialog() 
    {
     CDialog::OnInitDialog();
     
     // TODO: Add extra initialization here
     CEdit *Display;
    
     Display = reinterpret_cast<CEdit *>(GetDlgItem(IDC_DISPLAY));
     Display->SetWindowText("Word Processing");
    
     return TRUE;  // return TRUE unless you set the focus to a control
                   // EXCEPTION: OCX Property Pages should return FALSE
    }
    Like the static text control, the edit box starts displaying its text from the left side of the allocated rectangle. This alignment is controlled by the Align Text property. At design time, you can set it to Left, Center, or Right. If you are programmatically creating the control, you can change its text alignment with the following styles: ES_LEFT, ES_CENTER, or ES_RIGHT respectively.
    Edit Control Messages

    To manage its role on a form or dialog box, an edit control is equipped with some messages known as notifications. These notifications messages are:
    ON_EN_SETFOCUS: The event name for this notification is called OnSetFocus. It is sent when an edit box receives focus. This happens when the user clicks the edit box or after previously pressing Tab, to give focus to the control:
    BEGIN_MESSAGE_MAP(CDialog3aDlg, CDialog)
     //{{AFX_MSG_MAP(CDialog3aDlg)
     ON_WM_SYSCOMMAND()
     ON_WM_PAINT()
     ON_WM_QUERYDRAGICON()
     ON_EN_SETFOCUS(IDC_LAST_NAME, OnSetFocusLastName)
     //}}AFX_MSG_MAP
    END_MESSAGE_MAP()
    
    ...
    
    void CDialog3aDlg::OnSetFocusLastName() 
    {
     // TODO: Add your control notification handler code here
     m_Message.SetWindowText("The First Name has focus");
    }
    ON_EN_CHANGE: The OnChange event of this notification occurs as the user is typing text in the edit control. This happens as the user is changing the content of an edit control, which sends a message that the content of the edit box has changed. You can use this event to check, live, what the user is doing in the edit box. For example, if you create a dialog box or a form with a first and last names edit boxes, you can use another edit box to display the full name. You can implement the OnChange events of the edit boxes as follows:
    BEGIN_MESSAGE_MAP(CDialog3aDlg, CDialog)
     //{{AFX_MSG_MAP(CDialog3aDlg)
     ON_WM_SYSCOMMAND()
     ON_WM_PAINT()
     ON_WM_QUERYDRAGICON()
     ON_EN_SETFOCUS(IDC_LAST_NAME, OnSetFocusLastName)
     ON_EN_CHANGE(IDC_FIRST_NAME, OnChangeFirstName)
     ON_EN_CHANGE(IDC_LAST_NAME, OnChangeLastName)
     //}}AFX_MSG_MAP
    END_MESSAGE_MAP()
    
    ...
    
    void CDialog3aDlg::OnChangeFirstName() 
    {
     // TODO: Add your control notification handler code here
     m_FirstName.GetWindowText(m_strFirstName);
     m_LastName.GetWindowText(m_strLastName);
     CString FullName  = m_strFirstName + " " + m_strLastName;
    
     m_FullName.SetWindowText(FullName);
    }
    
    void CDialog3aDlg::OnChangeLastName() 
    {
     // TODO: Add your control notification handler code here
     m_FirstName.GetWindowText(m_strFirstName);
     m_LastName.GetWindowText(m_strLastName);
     CString FullName  = m_strFirstName + " " + m_strLastName;
    
     m_FullName.SetWindowText(FullName);
    }
    ON_EN_UPDATE: The OnUpdate event is sent after the content of an edit box has changed but before the text is formally displayed.
    ON_EN_MAXTTEXT: When adding a variable for the edit control, you can specify the maximum allowable number of characters the user can enter. If the user attempts exceeding this maximum, an OnMaxtext() event fires. You can catch this event to let the user know about the problem. If you set up the Maximum Characters fine, you do not need to perform any "if" or "while" checking. The edit control would do it itself.
    ON_EN_ERRSPACE: The OnErrSpace event is event is sent if the compiler encountered a problem when attempting to allocate memory space to the control.
    ON_EN_KILLFOCUS: The OnExit event occurs when the control loses focus. In the case of an edit box, this could happen if the control has focus and the user presses Tab; the edit box would lose focus.

    Click Here to watch Live Cricket
    ICC’s Cricket World Cups are the most prestigious and most widely followed event in India. Reliance Mobile also kicked off a series of promotional activities for ICC CWC 2011 as part of the partnership for the 2011 edition of the tournament scheduled to begin in February 2011. Cricketing legend and key member of Indian Cricket team which won the World Cup in 1983, Syed Kirmani was present at the occasion.
    This marked the beginning of the Reliance Mobile’s Trophy Preview across India before the tournament kicks off in Dhaka, Bangladesh on February 19, 2011. The ICC CWC 2011 Trophy will be handed over to the winning team of this tournament which is the 10th edition.
    Reliance Communications has a long standing association with Cricket having sponsored prestigious events like the ICC Champions Trophy and all the editions of the ICC World T20. The company received overwhelming response to its Value Added Services (VAS) offerings from cricket loving fans during the ICC World T20 tournaments. Encouraged by this,Reliance Mobile is all set to launch a host of services that provides exciting audio and video content on both 3G and 2G platforms during the ICC CWC 2011. The company has bagged the license to offer 3G services in 13 key circles including Mumbai, Delhi and Kolkata.Reliance Mobile also offers pan-India CDMA and GSM Services across 24000 towns and 6 lakh Indian villages serving over 115 million customers.
    Reliance Mobile will go LIVE with all ICC CWC 2011 matches through its already live specially created ICC zone on R-World VAS platform. Reliance Mobile customers will be able to keep a track of the 49 ICC CWC 2011 matches via WAP and SMS Alerts. They will be able to watch live stream of match highlights videos, watch previews and match round-ups, and download wallpapers and ringtones, anytime anywhere, with their handsets on both GSM and CDMA networks.
    For cricket buffs, Reliance Mobile will provide access to ICC rankings, archived content of previous tournaments, news & analysis of match/tournament/players, ball-by-ball score updates on Wireless Application Protocol (WAP) and Data protocol. Customers will have the choice of downloading video clips and receiving video alerts over SMS.
    Reliance Mobile customers will have a range of services to choose from including video clippings of all matches India plays with live audio commentary and moment-by-moment text commentary on their handsets. Customers can capture the action and rare moments of the championship and set them as wallpapers. They can also set the ICC World Cup theme song as their caller ring back tune and download the video of the theme song.
    Commenting on Reliance Mobile’s association with ICC Cricket World Cup 2011, Akshay Kumar, CEO & Regional Head, South West, Reliance Communications said, “The key market drivers will be the increasing availability of 3G services and support for high quality video, the globalization of sport personalities and club support, and the improvement of digital sports rights for mobile distribution.”
    He added, “These drivers apply to many types of leisure and information content, but none more so than sports content. There is a great opportunity for content owners, application service providers and operators to exploit sport content over the mobile channel in multiple innovative ways”
    Mobile sports information and entertainment services are expected to take an increasing share of global mobile sports, leisure and information content (infotainment) market over the next five years. Juniper Research forecasts that the global market for mobile sports content and service will grow at an average growth rate of 27 percent.
    Reliance Mobile will offer this world class application for iPhone, iTouch devices, Blackberry, Android & Symbian enabled devices, Nokia Ovi Store, Java devices and Samsung app store handsets.
    ICC Chief Executive Haroon Lorgat said: “As we prepare for what will be a great celebration of the game at our flagship event next year, we are fortunate to have a group of top-class partners whose commitment to the game is unquestioned. Without that commitment we would not be in a position to help our 105 Members grow the game as they do around the world. Through its commitment to and passion for the game,Reliance Mobile is helping to make our great sport even greater.”
    ICC Cricket World Cup 2011:
    The ICC CWC 2011 will be played in the 50 over a side or ODI format. The top 14 cricketing nations will participate to vie for the prestigious top spot. The event opener hasIndia taking on Bangladesh at the Dhaka on February 19th, 2011 post an elaborately planned opening ceremony and the final will take place at Wankhade Stadium, Mumbai on April 2nd, 2011. Bangladesh, India and Sri Lanka are host nations and the matches are being played across 13 stadia spread across these three countries.
    The 14 teams have been placed into two Groups, which are as follows:
    Group A: Australia, Pakistan, New Zealand, Sri Lanka, Zimbabwe, Canada & Kenya
    Group B: India, South Africa, England, West Indies, Bangladesh, Ireland & the Netherlands
    The tournament comprising of 49 matches will be played across a span of 42 days with India hosting 29 matches across eight venues including the finals and one semi-final. Sri Lanka will host 12 matches at three venues across the island nation; Bangladesh will host eight matches at two venues including the inaugural game and one quarter final, both to be played at Dhaka.
    The 10th edition of the ICC CWC is expected to be an intensely gruelling and fiercely competitive tournament between the 14 teams who will battle for a record prize pool of US $ 10 million. All the matches will be aired live on ESPN Star Sports.